Series: How To Cook Thanksgiving Dinner: The Main Item

This is a series of links to recipes, videos and more for creating your perfect holiday feast. The first one is for the main item, the turkey, crown roast or whole roasted cauliflower for a vegan option.Nut Crusted Fresh Fruit Tart

Following series over the next few days leading up to the big day, will be the following posts:

  • Vegetables and side dishes
  • Breads and rolls
  • Desserts
  • What to do with left overs

Whether this is your first Thanksgiving dinner or your 50th, here are some tips and recipes for making the feast stress free.

I’m linking to the posts I’ve published over the years so click the links and create the Perfect Thanksgiving meal!

Let’s take a look at The Main Item

How to Roast a Turkey – a Step by step guide, with pictures.

Remember to click on the links for the full posts!

Of course if you don’t eat bacon, don’t use it, but it sure is delicious! If not using bacon, be sure to baste the bird every 1/2 hour. If the skin gets to dark, tent it with foil.

Tips for the Turkey:

  • Order fresh organic birds well in advance
  • If getting a frozen bird, allow it 3-4 days to thaw in your refrigerator
  • If brining your bird, remember to keep it cold
  • Open up all the cavities and remove any packets of innards, necks etc, from the inside, use these to make stock for gravy
  • Allow ample time to roast the bird and to let the bird rest at least 20 minutes before you start carving.
  • Save the bones to make stock. I love making stock on a cold dreary day. It makes everything smell so warm!

Turkey Roasting Chart for unstuffed and stuffed birds: Calculate your roasting time with this chart http://www.foodsafety.gov/keep/charts/turkeyroastingchart.html
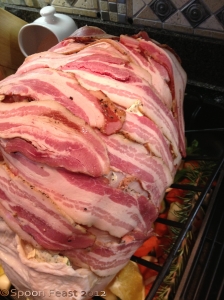
Cover with bacon strips to baste the turkey during the initial phase of roasting. Remember the large bird will roast for several hours. After the first 2-3 hours, the bacon will be done, remove it and this becomes the "cooks treat". Continue roasting the bird, basting every 30-40 minutes. The skin will crisp and become golden brown. If the skin starts to get too brown before the bird is done, tent it with foil.

Cover with bacon strips to baste the turkey during the initial phase of roasting. Remember the large bird will roast for several hours. After the first 2-3 hours, the bacon will be done, remove it and this becomes the “cooks treat”. Continue roasting the bird, basting every 30-40 minutes. The skin will crisp and become golden brown. If the skin starts to get too brown before the bird is done, tent it with foil.

If Turkey isn’t on your menu but a Crown Roast is,

Here is a video from Charlotte Cooks on How to make a Crown Roast of Pork or Lamb (Mint Sauce recipe on the site)

Watch it here:

Tips for the Crown Roast:

  • Be sure to order your roast well is advance from your butcher. These aren’t typically an “off the shelf” kind of item. they will even french the bones (recommended) and tie it for you, just ask.
  • Use your favorite stuffing
  • Use a meat thermometer to cook it just right:
    • Rare: 135°F remove at 125°F and allow carry over cooking to reach 135°F
    • Medium Rare: 140°F Remove at 135°F and allow carry over to reach 140°F
    • Medium: 145°F Remove at 140°F and allow carry over to reach 145°F
    • Mid well to well 150°F and above. It is suggested to remove the number of well done portions from the others and finish those later rather than subject the entire roast to well-doneness disaster.
  • Carry over cooking is when the internal temperature of the meat continues to rise after it is removed from the oven.
  • Allow the roast to rest at least 20 minutes before slicing.

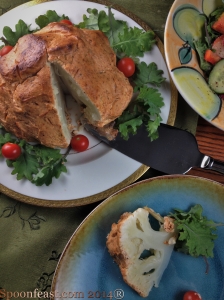
If a vegan meal is on your menu, you can Roast a Whole Cauliflower.

We love this and have it often during the year.

Tips for the Vegan Roast:

Plated roasted cauliflower

Plated roasted cauliflower

  • Buy large unblemished organic cauliflower; it really has the best flavor.
  • Use Greek yogurt, it’s thicker. Or drain plain yogurt in cheesecloth or a strainer over night to thicken it.
  • Use any leftovers to make a delicious soup!


So! There are some ideas for your main menu item on the Thanksgiving table.

Next up: Vegetable side dishes!

Happy Holidays!

#thanksgiving #thanksgivingrecipes #thanksgivingdinner #howtoroastaturkey #howtomakeacrownroast #stuffing #holidaymeal #veganroast



Make Almond Milk – It’s So Easy!

It’s so easy to make almond milk at home, why wouldn’t you?

Almond Milk and Cookies

Almond Milk and Cookies

The most difficult thing is to remember to soak the almonds overnight. Once you start making your own milk on a regular basis, you’ll get into a rhythm. There is not one bit of this that is hard to do.

The ingredients are few, recognizable as real food and delicious.

Here’s how:

Almond Milk, lightly sweetened

  • Servings: 5 eight ounce
  • Difficulty: easy
  • Print

Ingredients for Almond Milk

Ingredients for Almond Milk

To make 5 cups:

1 cup raw almonds, skin on

Water to cover for initial soaking; about 4-5 cups (this water gets discarded)

4 cups water – to make the milk

3 Medjool dates, remove the pits

1 teaspoon vanilla extract

pinch of salt

Method:

Place the almonds in a bowl, cover them with fresh water. Cover the bowl and allow the almonds to soak for 12-24 hours.

Drain the water and use it to water some plants.

Place the soaked almonds into a blender.IMG_9859

Add 4 cups fresh water, pitted dates, vanilla and salt into a high-powered blender. Secure the cover and turn on high. Allow it to run on high for 2-4 minutes, depending on the power of your blender. If you are using a vita-mix, use the lower time to 2 minutes, more generic style blenders, process for a longer time.

Use a wire mesh strainer over a bowl to strain the milk from the solids. Using a rubber spatula or bowl scraper,work the almond, date pulp around the wire strainer until it’s as dry as you can get it. Save this for another use, after all it’s just ground almonds, dates and vanilla.

Straining Almond Milk

Straining Almond Milk

Pour the milk into a pitcher or milk jug and refrigerate until well chilled.

This milk is very lightly sweetened and is the consistency of whole milk. If you want it thinner, add more water, thicker, use less water. Same with the dates for sweetening.

You want chocolate Almond Milk? Add organic dark coc

oa powder with the dates. Simply amazing.

Almond Milk Label

Almond Milk Label

Once you try this homemade almond milk, you’ll be so spoiled! Read the labels on a store-bought almond milk. Which would you prefer to drink and give to your family?

The ground almonds and dates left over from the process make nice cakes and cookies. I’ve used the almond debris to replace zucchini in zucchini brownies with great success.

I’ve made Chocolate Almond Cherry Ice Cream and no bake almond butter, date and oat balls.

Almond milk "debris"

Almond milk “debris”

How do you use the almond debris left over from the milk? I’m getting fat from the cakes and cookies!

#almondmilk #makeyourown #makealmondmilk #almonds #noprocessedfood #wholefoods #vegan #nondairymilk #nutmilk

#makenutmilkathome #healthyeating #wellness

Almond Milk and Almond Cranberry cookies made from the debris

Almond Milk and Almond Cranberry cookies made from the debris

Pumpkin Snicker-doodles

Pumpkin Snicker-doodles are delightful. Full of rich Autumnal flavors, they are sure to please your sweet tooth craving.

Yum! Cookies!

I made last year and sent some down to Tyler. I had my culinary students make them to share with the local Ronald McDonald House, and now my son wants the recipe again. He had several friends last year who were going to another friends home for Thanksgiving and they wanted to take these pumpkin cookies.

So somehow they found a kitchen to bake in. We had an afternoon of “cooking by text” with successful results. Hopefully they had enough to take to their hostess.

This year he and his girlfriend are in apartments and have their own kitchens. They are going to cook for each other this year. I am publishing the recipe for Pumpkin Snicker-doodles, along with the method and photos so one of them can make the cookies again.

So, you don’t like pumpkin? Substitute mashed banana instead of pumpkin.

This recipe makes a lot of cookies so you may want to cut the recipe in half or just share!

Here are some reasons you should make these this afternoon:

  • They are easy
  • They taste great
  • They look impressive
  • The recipe makes a lot of cookies so there is plenty to share
  • Your house will smell wonderful all afternoon
  • You can freeze some dough to bake later
  • It’s another Pumpkin thing!
  • Fall is in the air

Pumpkin Snickerdoodles

  • Servings: A lot of small cookies! About 6 dozen
  • Difficulty: moderate to easy
  • Print

  • 1 cup softened butter (2 sticks)
  • 2 cup white sugar
  • ½ cup brown sugar
  • 3  large eggs
  • 1 cup pumpkin puree
  • 2 teaspoons vanilla
  • 6 cups AP flour
  • 2 teaspoons baking soda
  • 1 Tablespoon + 1 teaspoon cream of tartar
  • 1 tablespoon ground ginger
  • 2 tsp. cinnamon
  • 1 tsp. cloves
  • 1 tsp. salt

For rolling dough balls in before baking:

  • 1 cup white sugar mixed
  • 1 ½  tsp. cinnamon

In a large mixing bowl beat butter, both sugars, eggs, pumpkin puree, and vanilla on medium until butter is evenly incorporated into pumpkin.

In another bowl combine flour, baking soda, cream of tartar, salt and spices.

Fully Mixed Dough, Chill for at least 1 hour

Roll balls of the chilled dough in cinnamon sugar

Space the cookies 2″ apart on a lined sheet pan. Use parchment paper if you don’t have a silpat sheet. Flatten slightly with your fingers.

Beat dry ingredients into wet until it is all mixed in.  The dough will be fluffy but very sticky.

Cover and chill for at least an hour.

Pre-heat oven to 375°.

Using a cookie scoop or two spoons  form golf-ball sized balls with the chilled dough.

Roll balls in cinnamon sugar.

Place 2” apart on a baking sheet lined with parchment paper.

Flatten slightly with fingers, but not too much.

Bake for 15 minutes, or until the tops are crackled and the edges are light golden brown.

Let cool for a couple of minutes on the baking sheet before removing to cooling sheets.

Cool cookies on a wire rack before drizzling with icing sugar.

To make icing sugar, combine 10x powdered sugar with a small bit of milk and a few drops of vanilla. Add the liquid a few drops at a time as the sugar will reach drizzling consistency quickly. Us a fork to drizzle, allow to dry before stacking cookies.

Eat and be happy!

Pumpkin Snicker doodles


Almond, Date, Cranberry and Lime “No-Bake” Cookies

A Morsel of Almond Date Cranberry Lime Cookie

A Morsel of Almond Date Cranberry Lime Cookie

Almond, Date, Cranberry and Lime “No-Bake” Cookies are a real treat!

They are a “no-bake” cookie which puts them in the raw category; they are no sugar, eggs or butter so they also fall into the vegan category. With all natural ingredients so they also fall into the healthy foods and nutritious category.

Personally, my favorite category for  these morsels: Delicious!

Keep in mind some people might be put off thinking they are eating a raw cookie. So change the language and present these delicious morsels.

NOTE: Don’t fall prey to marketing ploys and think that because the label claims “healthy, all-natural or nutritious” does not mean low in calories! Learn to read a nutrition label and compare information.

Here’s the recipe for the cookies. It’s pretty much put it all in a food processor and pulse until a dough forms. Have fun!

Almond, Date, Cranberry and Lime “No-Bake” Cookies

  • 1/2 cup pitted Medjool Dates
  • 1/4 cup dried cranberries
  • 1 cup almond meal
  • 1/2 to 3/4 cup crunchy almond butter
  • 1 generous Tablespoon coconut oil
  • 2 Tablespoons vanilla extract
  • Zest and juice from 1 lime
  • Pinch of Sea Salt

Place all ingredients into the bowl of a food processor. Pulse until a dough forms. Leave some nuts chunky for a cookie that has some crunch.

Taste the dough and see if it need adjustment: a bit more salt? More vanilla or lime?

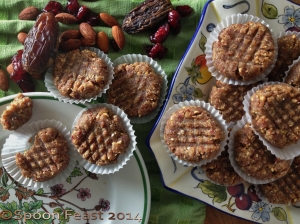
Form the dough into about 18 balls. Place the balls on a cookie sheet. Flatten each cookie with a fork.

That’s it.

Flatten the dough balls with a fork; like you would peanut butter cookies

Flatten the dough balls with a fork; like you would peanut butter cookies

The texture is kinda like fudge but in a much better way. If you leave some nuts slightly chunky, your cookie can have a crunchy texture too, but if you want a smooth cookie, pulse until smooth.

You can choose to roll the cookies in coconut, chopped nuts or cocoa with a dash if cinnamon if desired. Use peanut butter, cashew or almond butter with cocoa in it. I guess in a pinch you could use Nutella but the point here is to avoid added sugar and processed foods in delicious ways.

(OK, so now I have to make another batch using the cocoa!!!)

Most people would never realize these are considered “raw food” but they are.

These certainly aren’t low in calories but the sure supply great nutrients: Potassium, fiber, iron, B-6 and magnesium and vitamin E.

Just a note, you can leave the coconut oil out but it adds so much, I would use it.

Oh, and don’t bake these beauties for any reason! If you try, all that will happen is the oils from the nuts will leak out and leave you with a rather unpleasant mess. So if you want  a baked cookie recipe, use another recipe, not this one.

Hopefully you make your own vanilla extract, if not, go get ya some vanilla beans and some 100 proof vodka and make some!

Click this link: Perpetual Vanilla Extract

Please make a batch of these and let me know how you like them and how they go over with friend and family.

Raw Almond Date Cranberry Cookies  Rather than "raw" let's call them "No Bake"

Raw Almond Date Cranberry Cookies
Rather than “raw” let’s call them “No Bake”

Nut Crusted Fruit Tart Re-Visited

Nut Crusted Fruit Tart Re-Visited was in the make as we ate the first tart.

So delicious, we started talking how we could modify the recipe.

The second Nut Crusted Fruit Tart

The second Nut Crusted Fruit Tart

This is how we changed it.

For the Crust:

Keeping in mind the ratio is 1 cup dried fruit to 1 cup nuts, the possibilities are limitless!

This time we used:

  • 1/3 cup almonds
  • 1/3 cup pecans
  • 1/3 cup pistachios
  • 1/2 cup dates
  • 1/2 cup dried cranberries
  • 4 pitted prunes
  • 1 Tablespoon vanilla extract
Look at that crust! I love how the cranberries and pistachios look!

Look at that crust! I love how the cranberries and pistachios look!

This made a beautiful crust! Just process it all in a food processor and press it into your pan. The consistency should hold together when your squeeze a bit of the mixture in your hand. If it doesn’t, add more dried fruit until it holds together.

Fruit Filling

This time we had a bit of each of these fruits on hand:

  • Mango
  • Strawberries
  • Blueberries
  • Blackberries
  • Raspberries
  • Bananas

This time I photographed how to lay in the bananas.

Tyler asked if the bananas could be substituted but the role they play is to provide a nice base for the fruit to lay on also, to absorb some of the juices. The bananas also mimic the custard, pastry cream  or marzipan filling on traditional fruit tarts. Here’s how you lay the bananas in the pan.

Flatten the bananas into the pan, cut side down.

Flatten the bananas into the pan, cut side down.

We were short on strawberries for the puree, so we pureed a mango instead. I think kiwi puree would look amazing!

Place strawberries on top of the bananas

Place strawberries on top of the bananas

Add the puree the edge with raspberries and blackberries

Add the puree the edge with raspberries and blackberries

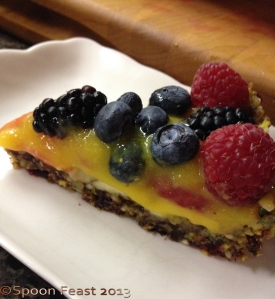
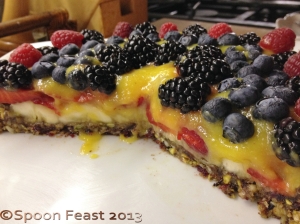
On top of the bananas, we placed sliced strawberries, then poured the mango puree over the top of the tart. Then we placed raspberries and blackberries around the edge, a ring of blueberries, then a ring of blackberries, leaving the center open to show the brilliant mango color in the center.

A nice slice!

A nice slice!

To maintain a healthy dish, instead of adding that tempting dollop of whipped cream, use Greek yogurt flavored with honey and vanilla instead. And if mint was growing outside now, I’d also add a mint leaf or two.A nice slice!

Here’s the thing about this tart:

No cooking! All you need to make this is a knife, cutting board, a food processor large or small, a tart or pie pan.

Since Tyler is moving back on campus next semester, he will use his Kitchenaid “Handy-Chopper” which is a nice small convenient unit.

Tyler has decided to use this as his signature go-to dish. I think his roommates will be impressed.

Nut crusted Fruit Tart with Mango Puree

Nut crusted Fruit Tart with Mango Puree

How to Make Mustard

Learning how to make mustard can be as simple as mixing a few things together or as complicated as soaking a few seeds. It’s not hard at all to make.

Make Your Own Mustard

While there are many different kinds of mustard you can make, this is a kinder gentler mustard, not too pungent.

All it takes is mix the ingredients together, heat until thick, bottle and cool.

Simple!

Make Basic Mustard

  • 1/2 cup dry mustard powder, Coleman’s is my favorite.
  • 2 1/2 tablespoons all-purpose flour
  • 1/4 cup brown sugar, light or dark doesn’t matter
  • 1/2 teaspoon kosher salt (non-iodized)
  • 1/2 cup good quality white wine vinegar

Measure and mix everything in a heat-resistant bowl until a thin smooth paste forms.

Place the bowl over a pot of boiling water to make a double boiler, heat the mixture until it becomes thick. As the mustard thickens, whisk so it remains smooth.

Use a silicone spatula to get all the mustard in to a clean glass jar.

Allow to cool, cover, label and store.The mustard needs to sit for at least 2 hours before serving. The mustard will also “mellow” as it ages in the refrigerator.

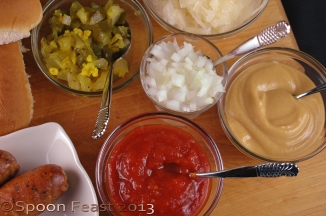
Homemade Ketchup, Mustard and Relish

Homemade Ketchup, Mustard and Relish

I haven’t had a jar around long enough to tell you how long it lasts.

Use it as you would any mustard but be warned, it will spoil you from buying  processed store-bought mustard.

Dip a tasty sausage into mustard!

Dip a tasty sausage into mustard!

Decorate your hot dog the homemade mustard

Decorate your hot dog the homemade mustard

More mustard recipes coming soon such as whole grain mustard, Dijon style, champagne honey, and pear/apple mostarda.

Learning how to make mustard is an easy thing to do to reduce your consumption of processed foods.

Basic Mustard

Basic Mustard – Got a Pretzel?

Jacques Pepin: How to Debone a Chicken

The best video I have ever seen on how to do this process.

Buy some chickens, do it and practice!

Cooking time is about 2 hours at 350°F is a roasting pan.

Place a small bit of stock in the bottom of a pan with a couple of chopped carrots, onion and celery for flavor.

Use your favorite stuffing. When practicing, I make and donate the cooked chickens to Ronald McDonald House so we don’t get sick and tired of eating skills practice.

As Jacques says, you can do this with all birds.

What fun!

Simple (And Great Tasting!) Bean Burger

Bean Burger

Bean Burger; Can you see it under the mushrooms and onions? I had to take the picture before Robert got to the table and didn’t have time to “present” the burger for photos.

This simple and great tasting bean burger is quite simple to make and is versatile enough to become many things besides burgers.

  • 1 15-ounce can dark red kidney beans
  • 2 cups cooked old-fashioned oatmeal
  • 1 tablespoon dried vegetable flakes (optional)
  • 1 teaspoon minced garlic
  • 1 teaspoon minced onion
  • 1/2 cup ground pistachio or almond meal
  • 1 tablespoon Bragg’s liquid aminos (the salt)

Start by cooking the oatmeal. Include the garlic, onions and dried vegetable flakes if using for flavor.

Drain the beans, rinse and add to the oatmeal.

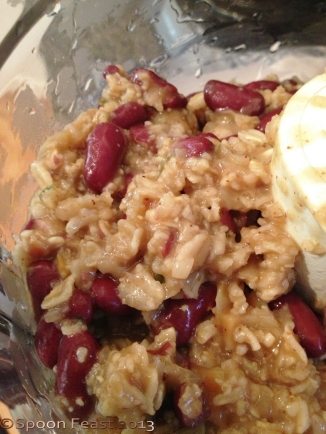
Combine the oats and beans and all the seasonings

Combine the oats and beans and all the seasonings

Process the mixture in a food processor until things are coarsely chopped up. You do not want to make a paste.

Coarsely chop

Coarsely chop

Form burgers using a scoop for even sizes.

Scoop for even size

Scoop for even size

Pat the burgers with additional pistachio or almond meal to ‘dry’ the outside of the burger. This will allow it to become nice and golden brown.

Using a very small amount of coconut oil or olive oil in the bottom of a saute pan (or use a non-stick pat and go fat-free) place the bean burgers into the hot pan, being careful not to overcrowd the pan.

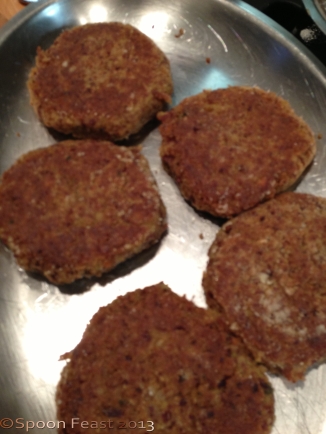
Saute them until golden brown on one side, flip and cook on the other side until golden brown too.

You can finish cooking them in the oven or hold them in the oven until you are ready to eat.

Delicious Cooked Bean Burgers

Delicious Cooked Bean Burgers

Remove the burgers from the saute pan and then add sliced mushrooms and sliced onions, saute for 2 minutes, then add 1-2 tablespoons of water, continue cooking until the water is evaporated.

Serve the sautéed onions and mushrooms over the bean burgers.

This evening, we served them on a bed of fresh spinach with a side Caesar salad. I couldn’t eat it all!

If you have leftovers, you can saute the  crumbled burgers with some diced onions, chili powder, cumin and diced tomatoes to make “taco meat”. Fill corn tortillas and finish with your favorite taco toppings.

I find this can be used nearly the same as you would ground meat. Make chili, tacos, casseroles etc.

Enjoy!

Bean Burger topped with sauteed onions and mushrooms

Bean Burger topped with sauteed onions and mushrooms

Caesar Salad – A Fresh Look

Caesar Salads have long been popular both in the restaurant scene and at home. I love a good Caesar Salad especially if you add some Caesar Saladgrilled chicken to it and lots of Parmesan cheese.

The dressing here is a low-fat version of a traditional Caesar. This maintains the flavor of the dressing the same as a traditional Caesar dressing, yet with far less fat. So you will find a stray from the traditional Caesar Dressing ingredients, but try this, you’d never know the difference!

Plating the salad becomes a real presentation. Take your time and you will be rewarded with not only a nice visual but also something that will satisfy your taste buds on many levels.

For the Salad:

      • Romaine Hearts – each one makes 1-2 servings; 3 for an appetizer or side salad
          • Keep the lettuce in tact!
  • Good quality bread for the “croutons”
  • Parmesan cheese, shredded or shaved off a block with a vegetable peeler
  • Anchovy fillets – white anchovies are a gourmet treat, but everyday anchovies will do also
  • Dressing (recipe follows)
  • Add Grilled chicken or shrimp if desired.

To make the dressing:

  • 1/2 cup low or non-fat mayonnaise
  • 1/2 cup low or non-fat plain Greek yogurt
  • 1/4 cup shredded Parmesan cheese (use the best quality you can buy!)
  • juice from 1/2 lemon
  • 1 tablespoon Worcestershire sauce
  • 4 oil packed anchovy fillets (or more if you like)
  • 2 cloves fresh garlic
  • 1 -2 teaspoons fresh ground black pepper

Put it all in the blender and process until smooth. Taste it, you may want more anchovy or garlic or cheese. If you do, add it and process again until smooth. If it gets too thick, thin with water.

Wash the lettuce, carefully remove any dirt or debris while keeping the head in tact. Turn the romaine heart upside down to drip dry or pat it dry with a paper towel.

Holding the romaine heart upright in a clean bowl, drizzle the leaves with the dressing, use about 1-2 ounces per heart.

Wrap tightly into a log shape

Wrap tightly into a log shape

Wrap the lettuce tightly in a log shape in plastic wrap. When you do this, arrange the leaves so they don’t break. You want to be able to wrap it together really tight.

Refrigerate for at least 30 minutes.

Brush the bread with olive oil, grill each side for 1-2 minutes.

Roll the anchovy fillets into ‘mini-flowers’.

Make Crispy Parmesan Chips

Rolled anchovy fillets

Rolled anchovy fillets

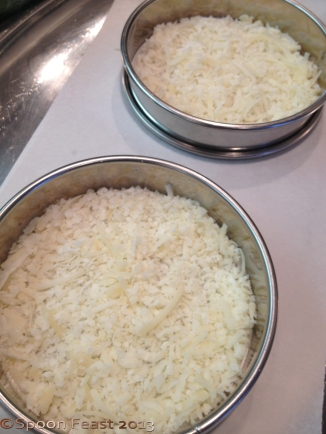
Make some crispy Parmesan chips by placing freshly shredded (grated cheese does not work) onto a piece of oiled parchment in a circle.

Use a ring mold for even shapes

Use a ring mold for even shapes

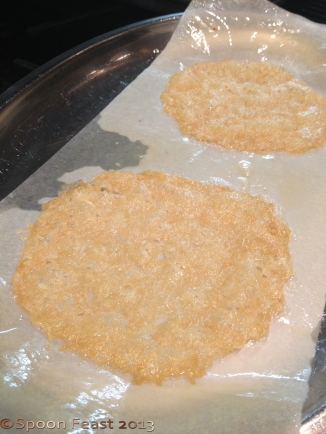
Use a ring mold to make even sized circles. Bake them in a 350°F oven for 5-10 minutes or until they turn golden brown.

Remove when the cheese gets golden brown

Remove when the cheese gets golden brown

Remove from the oven and using a spatula, remove them from the parchment immediately as the cheese cools rapidly. At this point, they will retain any shape you give them. but you have to move fast, once they cool they become crisp.

For this presentation, instead of making croutons, I cut the bread into a long rectangle, oiled it and then put it on the grill for a few minutes.

Plate Presentation:

Lay two lengths of bread on the base of the plate.

With the plastic wrap still on the lettuce, slice the lettuce into rounds about 2″ wide.

Slice the lettuce with the plastic wrap still on. Of course, remove it as you bring the lettuce to the plate.

Slice the lettuce with the plastic wrap still on. Of course, remove it as you bring the lettuce to the plate.

Remove the plastic wrap and place them on the bread. Stand them up with the cut side down. Do this carefully and they will hold together.

Place a crispy cheese round on top of the cut lettuce, then add the rolled anchovies.

IMG_5419

Place either the grilled chicken or shrimp along side of the bread, sprinkle with Parmesan. Drizzle some dressing onto the plate and serve.

The presentation is nice because when you want to eat the lettuce, it falls apart easily with your fork and does not require further cutting unless you cut them too wide. 2 inches is the perfect size for this presentation.

Enjoy this Caesar!

IMG_5422

How to make Cranberry Sauce – easier than you think!

Dear Tyler:

Cranberry Sauce is easier than you think! Glad you asked. It is very exciting to be cooking your first Thanksgiving Feast! So here is the recipe you asked for:

How to make cranberry sauce

Forget the can. Grab a bag of fresh cranberries, sugar and some water, oranges and sherry (a fortified wine, like Marsala) and we can have an array of cranberry sauces to amaze everyone.

Here are 3 super easy and full of flavor cranberry sauces. The only one I don’t think you’ll try is the sherry one, but one day, perhaps you will enjoy the complexity of flavors of sherry and cranberry.

The first recipe is found on nearly every bag of fresh cranberries.

Easy Cranberry Sauce

  • 1 12-16 ounce bag of fresh cranberries or equivalent  of frozen berries.
  • 1 cup water
  • 1 cup sugar
  • pinch of salt

Put it all in the pot and bring to a boil

Add all ingredients to a  deep sauce pan. Bring to a boil, reduce heat and simmer at an active simmer for 5 minutes.

Boil then actively simmer for 5 minutes. Serve warm or cold.

Serve warm, room temperature or cold with roasted or grilled meats. Especially Thanksgiving Turkey!

Cranberry Orange Sauce

  • 1 orange, cut into quarters
  • 1 12-oz bag fresh or frozen cranberries
  • 1/2 cup sugar
  • pinch salt

Remove the pithy core and seeds’ cut into quarters. Use a blender or food processor to puree.

Remove the seeds and the pithy core. Add the oranges, cranberries and sugar to a food processor or blender and puree until almost smooth. Thin with either cranberry or orange juice if needed.

Process until smooth

Place in a container and serve with just about whatever you want. I like turkey especially.

If you make this with frozen cranberries, you get a sorbet like consistency. Delicious!

Sherried Cranberry Sauce

  • 1 12-16 ounce bag of fresh cranberries or equivalent  of frozen berries.
  • 1 cup water
  • 1 cup sugar
  • pinch of salt
  • 1/4 cup dry sherry
Cranberry Sauce 003

Cranberry Sauce 003 (Photo credit: MGF/Lady Disdain)

Add all ingredients to a  deep sauce pan, except the sherry. Bring to a boil, reduce heat and simmer at an active simmer for 5 minutes.

Stir in the sherry. Blend until smooth if desired. Strain if you want a smooth sauce.

Serve warm, room temperature or cold with roasted or grilled meats.

These are the 3 most popular cranberry sauces our family uses.

So here you go. You can now carry on Turkey traditions!

3 Cranberry sauces from left to right: Orange Cranberry, Easy Cranberry Sauce and Sherried Cranberry Sauce

Tomorrow:

Since you are cooking your first turkey Thursday, I’ll write a post on:

How to Roast a Turkey

Love,

Mom