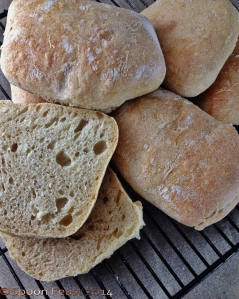
Ciabatta Bread

Timg_2177here is nothing quite like the aroma of freshly baked bread, unless it’s eating freshly baked bread.

This loaf can be made in just under 2 hours and is easy and really delicious. The only problem I have with this loaf is that it does not last very long.

It gets gobbled up super fast.


Ciabatta Bread

img_2175

Dry Ingredients: Combine in the bowl of a stand mixer

  • 3 ½ cups bread flour
  • 1 teaspoon organic sugar or coconut sugar
  • 1 ½ teaspoons instant yeast
  • 1 ½ teaspoons salt (non-iodized like Himalayan Pink Salt)

Wet Ingredients: Combine in a glass measuring cup

  • 1 ½ cups warm water (heat 30 seconds in a microwave until the water feels warm to your finger tip)
  • 1 Tablespoon olive oil

Using a dough hook, mix the dry ingredients on low speed. Slowly add the wet ingredients, mix until it is all combined.

Set the timer and knead on medium speed for 10 full minutes.

The dough will look wet and sticky. It is and that is the way it is supposed to be. A wet dough will give you the bigger holes Ciabatta is known for. Resist the temptation to add more flour! At 10 minutes kneading time, the dough will be perfect.

Remove the dough hook; cover the bowl with plastic wrap or a clean kitchen towel.  Allow to rest for 15 minutes in a warm area. (Your oven on bread proofing setting is perfect)

In the meantime, prepare a sheet pan with parchment paper (or Silpat sheet), lightly dust with cornmeal and set aside until needed.

Generously flour a surface to put the dough on after 15 minutes. Plop the entire dough mass onto the flour and dust the entire surface with flour so your hands don’t stick to the dough.

img_2169Press the dough into a rectangle, fold into thirds, and then repeat. Do not knead the dough, just lightly pat it into place. Pat, pat, pat, just lightly.

Shape the dough into a rectangle and place onto the baking sheet. Loosely cover and let rise for 45 minutes.

While the bread is rising outside the oven, preheat the inside of the oven to 425° F.

After the bread has risen for 45 minutes, spritz with water and place it into the oven. The water will help give the bread a crisp crust.

img_2174

Bake for 30 minutes. Remove from the oven and allow the bread to cool completely before slicing.

Shelf life: 3-5 days or until gone, typically the same day it’s made.

French Toast Stuffed with Goat Cheese and Slathered in Blueberry Sauce

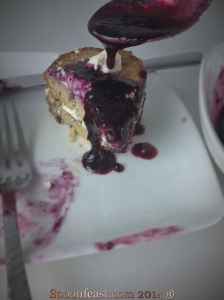
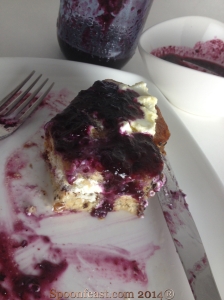
French Toast Stuffed with Goat Cheese and Slathered in Blueberry Sauce is delicious and nutritious although not diet food. This dish came to me while trying to use up some things to make room in the refrigerator.

French Toast Stuffed with Goat Cheese and Blueberry Syrup

French Toast Stuffed with Goat Cheese and Blueberry Syrup

I make 95% of the bread we eat and typically use lots of grains in the loaves. We buy organic eggs from the farmers market and the blueberry sauce is made from a batch of berries I bought to make a pie but never did. So instead of the berries going bad (I couldn’t believe no one ate them!) I made a sauce. The recipe is below and is very simple.

Goat Cheese Stuffed French Toast with Blueberry Sauce

  • Servings: 2-4
  • Difficulty: Easy
  • Print

  • 4-6 slices of good quality, nearly stale bread
  • 1 large egg
  • 1/4 cup unsweetened almond milk
  • 1 tablespoon vanilla
  • 1/2 teaspoon ground cinnamon
  • 1/4 teaspoon ground ginger
  • 1/4 teaspoon salt
  • Pinch of ground nutmeg (fresh ground is best!)
  • 1 tablespoon oil or just enough to coat the bottom of the pan
  • 1 ounce of fresh plain goat cheese for each serving

Mix all the ingredients, except the bread, in a flat pan. Place the sliced bread in the egg mixture, turning to coat. Let the bread sit in the mixture so it can soak it all up.

Heat a pan large enough to hold all the slices, place the soaked bread in the hot pan and cook until each side is golden brown.

Place the French Toast on a warm plate, immediately spread the goat cheese on one side of the bottom slice, top with another slice of hot French Toast.

Pour Blueberry Sauce all over and serve.

Now if you wanted, you could whip some honey and cinnamon into the goat cheese before spreading it onto the French Toast. It would put this dish completely over the top!French Toast stuffed with Goat Cheese

This is soooo good! And made with whole grains so you will feel full and had great energy all morning.

Like I said, not diet food, but whole, real food.

I hope you try this recipe and enjoy every bite.

French Toast stffed with Goat Cheese

Blueberry Sauce

  • Servings: Varies
  • Difficulty: Easy
  • Print

  • 1 pint of fresh or frozen blueberries
  • 1/2 cup organic sugar
  • 1/4 cup waterIMG_9355
  • Pinch of salt
  • Dash of cinnamon or zest from 1/2 lemon (Optional)

Wash and pick through the blueberries. Discard and soft, moldy or squished berries, leaves, stems and twigs. Combine everything into one pan and bring it to a boil. Simmer for about 10-15 minutes, until its thick. If you want the sauce smooth, put it in a blender or use an immersion blender to puree the sauce to the desired consistency. I like mine to have a few whole berries left in it. You can always choose to put some fresh berries with it when you serve it too.

This sauce is great on this decadent French Toast and over pancakes, ice cream and even over grilled salmon. Treat yourself and try that one!

Pita Bread From Laurel’s Kitchen

The other day I was reading about a basic bread recipe in one of my favorite old cookbooks Laurel’s Kitchen. She suggested to make one loaf from half of the batch of dough and then make about a dozen pita breads out of the other half.

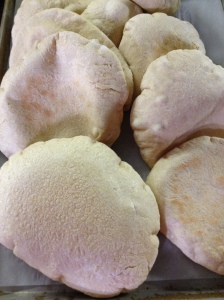
Puffed Pita

Puffed Pita

My curiosity was peaked. I’ve taught how to made pita bread in the bakeshop classes before, but I never considered making them at home. So, I though I’d give it a try.

I divided the dough into 12 round smooth balls, rolled them out and baked then on the hot pizza stone.

Dough balls for pita

Dough balls for pita

Here’s the recipe from Laurel’s Kitchen, not quite verbatim.

This is half of the original recipe since we aren’t making an additional loaf here today.

Pita Bread

  • Servings: about 12
  • Difficulty: moderate to skilled
  • Print

  • 1 teaspoon instant yeast
  • 3 cups whole wheat bread flour
  • 1 teaspoon salt
  • 1 1/4 to 1 1/2 cups warm water (not over 110°F)
  • 1 tablespoon honey
  • 1 tablespoon oil

Mix the dry ingredients, make a well in the center of the bowl. Mix the wet ingredients then pour them into the well made in the dry ingredient bowl. Mix on low-speed in a heavy-duty stand mixer fitted with a dough hook  until everything comes together.

If the dough seems too dry at this point, add water 1 tablespoon at a time until you reach  the desired consistency. If the mixture is too wet, add more flour.

The perfect dough will feel slightly sticky, not firm and clay-like.

If kneading by hand, knead for 20-30 minutes. Using the mixer, knead on medium speed for 8-10 minutes until the dough in elastic.

Oil the surface of the dough, cover and let rise in a warm place until nearly doubled in size.

Pre-heat the oven to 450°F, place a baking stone (if you have one) on the bottom shelf. Remove all other shelves before you heat the oven.

Turn the dough out onto a lightly floured board. Divide the dough into 12 or so smooth round balls. Cover and allow the dough to rest in a draft free area for 10 minutes. Laurel claims this step is essential.

Starting with the first ball made, roll out 2 or 3 balls into a disk “about the thickness of a good wool blanket” or 1/8 of an inch thick. The circles should be about 6″ around.

Roll to a thickness of a heavy wool blanket

Roll to a thickness of a heavy wool blanket

If using a heated baking sheet, place 2-3 dough circles flat onto the hot stone. Move quickly to retain heat in the oven, but don’t get burned either.

Quickly shut the oven door and set the timer for 3 minutes.

Turn on the oven light and watch the pita bake.

At 1 minute they look like Mrs. Douglas’ hot cakes on Green Acres; the next minute the magic happens as the dough begins to puff up like a balloon! It’s fun to watch! Let it cook through the third minute. The dough is done when the bottom side is lightly brown and the top side slightly moist, but not shiny wet.

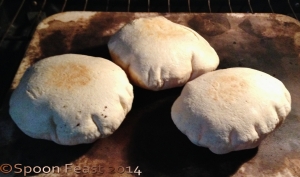
Poofy Pita!

Poofy Pita! I flipped these over so you can see the brown on the underside. Don’t let the top get brown or the bread will be too crispy.

Don’t let the pita get golden brown on top too or else the pita will dry out and be crispy instead of flexible and all foldy like.

The key is to be sure the dough circle lay flat on the stone or the baking sheet, whatever you use.

Cut the pita in half and you’ll see the perfect pocket for stuffing!

My favorite pita sandwich is a couple of slices of roasted chicken, turkey or ham filled with chopped salad and drizzled with Italian dressing, top with shredded cheese.

The chopped salad has lettuce, tomatoes, onions, cucumbers, sunflower seeds, radishes and shredded carrot in it, cut so it fits easily into the pocket pita.

Try it if you want, I sure had fun!

We’ve had pita sandwiches of all kinds, pita pizza, and toasted some for pita chips to go with the guacamole.

If you make them, be sure you watch them rise. It really is like magic!Baked pita

A word about Laurel’s Kitchen: The New Laurel’s Kitchen is a vegetarian cookbook published in 1976. It was one of my favorite books when it came out. I have literally worn out 2 copies and am working on a third.

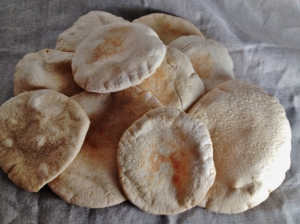
A Pile of Pita

A Pile of Pita

Ciabatta Rolls

I’m  sucker for good bread and these easy ciabatta rolls are simple and delicious, soft and chewy too!

This is a two-step recipe: one for a “biga” and the second step is making the dough using the biga.

The day before you want the bread is the time to start as the biga needs to ferment overnight.

Ciabatta Bread

Ciabatta Bread

Easy Ciabatta Rolls

For the Biga:

  • 1- 1/2 cups AP flour
  • 1/4 cup whole wheat flour
  • 1 cup water
  • 1 /8 teaspoon yeast

Mix these ingredients into a bowl, cover and let sit in a warm area for at least 12 hours, up to 24 hours. the mixture will be wet and bubbly.

The Biga when ready to use

The Biga when ready to use

Transfer the entire biga to a mixing bowl of a stand mixer then add:

For the dough:

  • All of the biga
  • 2-1/2 cups AP flour
  • 1/2 cup water
  • 2 teaspoons kosher salt
  • 1/2 teaspoon yeast

Mix all of the ingredients in a mixer on low-speed until well incorporated. Knead on low-speed for 2 minutes, then increase the speed to medium and knead for an additional 4 minutes.

Cover the bowl and let the dough rise for 1-2 hours. Once the dough is risen, turn the dough out onto a well floured surface. Shape the dough into a rectangle about 6″ x 12″.

Use a serrated knife or pizza wheel to cut the rectangle into 8 equal portions.

Ciabatta rolls ready to rise on a peel

Ciabatta rolls ready to rise on a peel

Place the rolls, flour side up onto a parchment lined baking sheet. Let rise for 45 minutes.

If you have a bakers peel, sprinkle it with corn meal and place the rolls on that to rise. Slide them onto the hot pizza stone after they have risen.

While the rolls are rising, preheat the oven to 450°F. If you have a pizza stone, preheat that too at this time.

Slide the rolls from the bakers peel onto the stone and bake for 12-15 minutes or until the rolls are golden brown.

Cool on a rack and enjoy!

These make great sandwiches and sop up soup like a champ, or slice them open for a quick pizza.

What’s your favorite way to use ciabatta rolls?

Ciabatta Bread

Ciabatta Bread

Easy Sandwich Rolls

When it comes to a good easy sandwich roll, a homemade one is hard to beat. Finding a great recipe is also a bit of a challenge.

I wanted a recipe that didn’t require an overnight sponge or two rising times. I wanted a recipe that could be done in just a couple of hours and have good texture and great flavor.

The recipe had to be versatile and most of all, fun.

First is the recipe as I made it and after, is a basic recipe that can be modified easily to give youSandwich Rolls a whole bunch of different results.
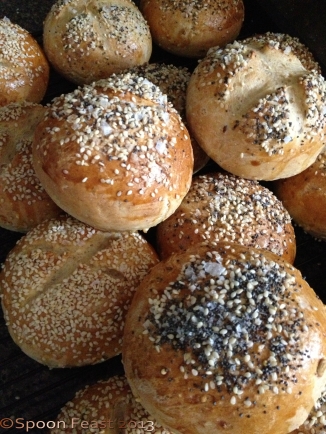
With practice, you could have these ready to eat within 2 hours.

Easy Sandwich Rolls

Ingredients

  • 1 cup non fat milk
  • 5 ounces water
  • 1 Tablespoon honey
  • 2 ounces butter
  • 1 egg at room temperature, beaten
  • 3 cups AP flour
  • 1 cup whole wheat flour
  • 1/2 cup mixed grains and seeds; soaked in 1/4 cup water
  • 2-1/4 teaspoons instant yeast
  • 1 1/2 teaspoons salt
  • Wash and topping:
  • 1 egg yolk with 1 Tablespoon water
  • Sesame and poppy seeds and coarse salt

Method:

Remove the egg from the refrigerator and crack it into a bowl. Beat it slightly with a fork, set it aside to come to room temperature.

Heat the milk, water and honey with the butter just until the butter melts. Cool until the temperature falls below 120°F then beat in the egg.

Measure 2 cups of AP flour, yeast, and salt in the bowl of a stand mixer. On low-speed, add the cooled milk mixture until a dough forms.

Slowly add the remaining flour a bit at a time. The dough will pull away from the sides of the bowl and will not be sticky when enough flour has been added. You may need to add additional flour beyond what is called for in the recipe.

Once a soft non sticky ball has formed, knead for 5-8 minutes until smooth and elastic.

Zero a scale and weigh the dough mass. Determine how many ounces of total weight you have. You can determine how many rolls to make in one of two ways.

1. Divide the total weight in ounces by how many rolls you need. Then cut off dough balls that of that weight and all rolls will be the same size.

2. Decide how large you want the rolls. The rolls featured are 3.2 ounce dough balls.

Seeded Sandwich Rolls

  • small slider rolls – 2 ounces – bake 10-12 minutes
  • sandwich or burger size rolls – 3.2 ounces – bake 12-14 minutes
  • large sandwich rolls – 4 ounces – bake up to 20 minutes
  • Hot Dog Buns: 4 ounce rolled into oblong shape, slice open on top or side – bake up to 20 minutes

As the dough balls are weighed, round each dough ball to create a smooth top. Place them 3 inches apart on a parchment lined baking sheet. If desired, sprinkle a bit of cornmeal under the rolls.

Place the smooth dough balls onto the prepared baking sheet, cover with a piece of plastic wrap that has been sprayed with non-stick oil. Let the rolls rise until they double in size – in a warm kitchen this may take 30-40 minutes.

Meanwhile, pre-heat the oven to 400°F

Once the rolls have risen, glaze them gently with egg yolk and sprinkle with seeds. The egg yolk helps the seeds stick and gives a nice shine to the finished roll. Brush the egg yolk on with a brush, being careful not to deflate the risen roll.

Bake the rolls in a 400°F oven for 12-15 minutes; 10-12 for the small rolls and up to 20 minutes for the larger rolls.

Verify internal temperature has reached 210°F and then cool the rolls on a rack. Be sure to space them so they don’t become soggy while cooling.

The final internal temperature should reach 210°F for any size.

Once the rolls have cooled, slice them open and fill with your favorite sandwich filling. The rolls are tender, absorbent to hold juicy fillings without getting messy, taste really good and look fantastic.

Once you see how easy it is to make these sandwich rolls, you’ll make them again and again.
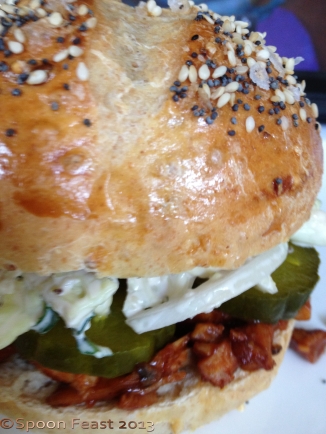
BBQ Chicken Sandwich on a Sandwich Roll with Cabbage and Kale Slaw and Sweet Pickle Chips

BBQ Chicken Sandwich on a Sandwich Roll with Cabbage and Kale Slaw and Sweet Pickle Chips

Plain White Sandwich Rolls

Ingredients

  • 1 cup non-fat milk
  • 1/2 cup warm water
  • 1 Tablespoon honey
  • 2 ounces butter, melted
  • 1 room temperature egg, beaten
  • 4 1/2 cups bread or AP flour
  • 2 1/4 teaspoons instant yeast
  • 1 1/2 teaspoons salt

Follow the same directions as the multi-grain rolls.

Use different toppings or slash the tops of some rolls for different looks.

If you use dried minced onions or dried minced garlic on the top of the unbaked rolls, be sure to soak the dried onions or garlic in a small amount of water before using as a topping. If they are not hydrated, they will burn and taste bitter.

Try adding cheese or shredded zucchini in place of butter to the recipe.

Use them as dinner rolls, give a bag to your neighbor.

To me one of the best parts of a sandwich is good bread. This is a great start.

Try them and let me know what you think and if you tried anything different.

Sandwich rolls

Sandwich rolls