Jacques Pepin: How to Debone a Chicken

The best video I have ever seen on how to do this process.

Buy some chickens, do it and practice!

Cooking time is about 2 hours at 350°F is a roasting pan.

Place a small bit of stock in the bottom of a pan with a couple of chopped carrots, onion and celery for flavor.

Use your favorite stuffing. When practicing, I make and donate the cooked chickens to Ronald McDonald House so we don’t get sick and tired of eating skills practice.

As Jacques says, you can do this with all birds.

What fun!

Wild Mushroom Arancini with Swiss Chard and Roasted Garlic

A miracle happened at our house recently. We had left over wild mushroom risotto. We have no idea how it happened but it is the only way to get to make arancini.

Mushroom Arancini

Mushroom Arancini

Arancini is made from left over risotto, breaded and sautéed to crispy golden brown.

Arancini 002

Arancini 002 (Photo credit: Wikipedia)

To go along with the arancini, I “water-sauteed” a bunch of red Swiss chard, added some roasted garlic, salt and pepper and 2 drops of liquid smoke – Yum! A lovely contrast of flavors that blend and contrast amazingly well with the arancini.

Here is how to make Arancini:

Use any left over risotto, in this case we had wild mushroom risotto.

Shape the risotto into equal size balls, flatten sightly and then dip them into a standard breading procedure of flour, egg wash, bread crumbs (or ground nuts, which would be amazing!)

Pan fry the arancini in a small amount of oil. Do this over medium heat so the inside of the arancini can get good and warm.

Once one side is golden brown, flip them over and brown the other side.

English: Swiss chard (Beta vulgaris) with vari...

English: Swiss chard (Beta vulgaris) with variously colored stems on sale at an outdoor farmers’ market in Rochester, Minnesota (Photo credit: Wikipedia)

To make the Swiss chard:

Wash the leaves and remove the stems. Reserve the stems for another use.

Chop the chard into 1″ ribbons.

Heat a saute pan to hot, do not add any oil. This is going to be a “water-saute”.

When the pan is hot, add the chard all at once, allowing whatever water still on the leaves to remain. “Water-saute” the chard until it wilts. Turning in the pan as the water evaporates.

Add a heaping spoonful of roasted garlic and a few drops of the garlic oil to the pan, stir gently to incorporate.

Season with fresh ground pepper, salt and 2 drops of liquid smoke (totally optional!)

Once all the liquid has evaporated, you are ready to serve.

Place a mound of the Swiss chard on the plate, place a wild mushroom arancini on the mound, garnish the plate with fresh tomato wedges, sliced fresh mushrooms and roasted garlic.

Simple, elegant and rich in flavors.

IMG_5500

Sorta “Socca”

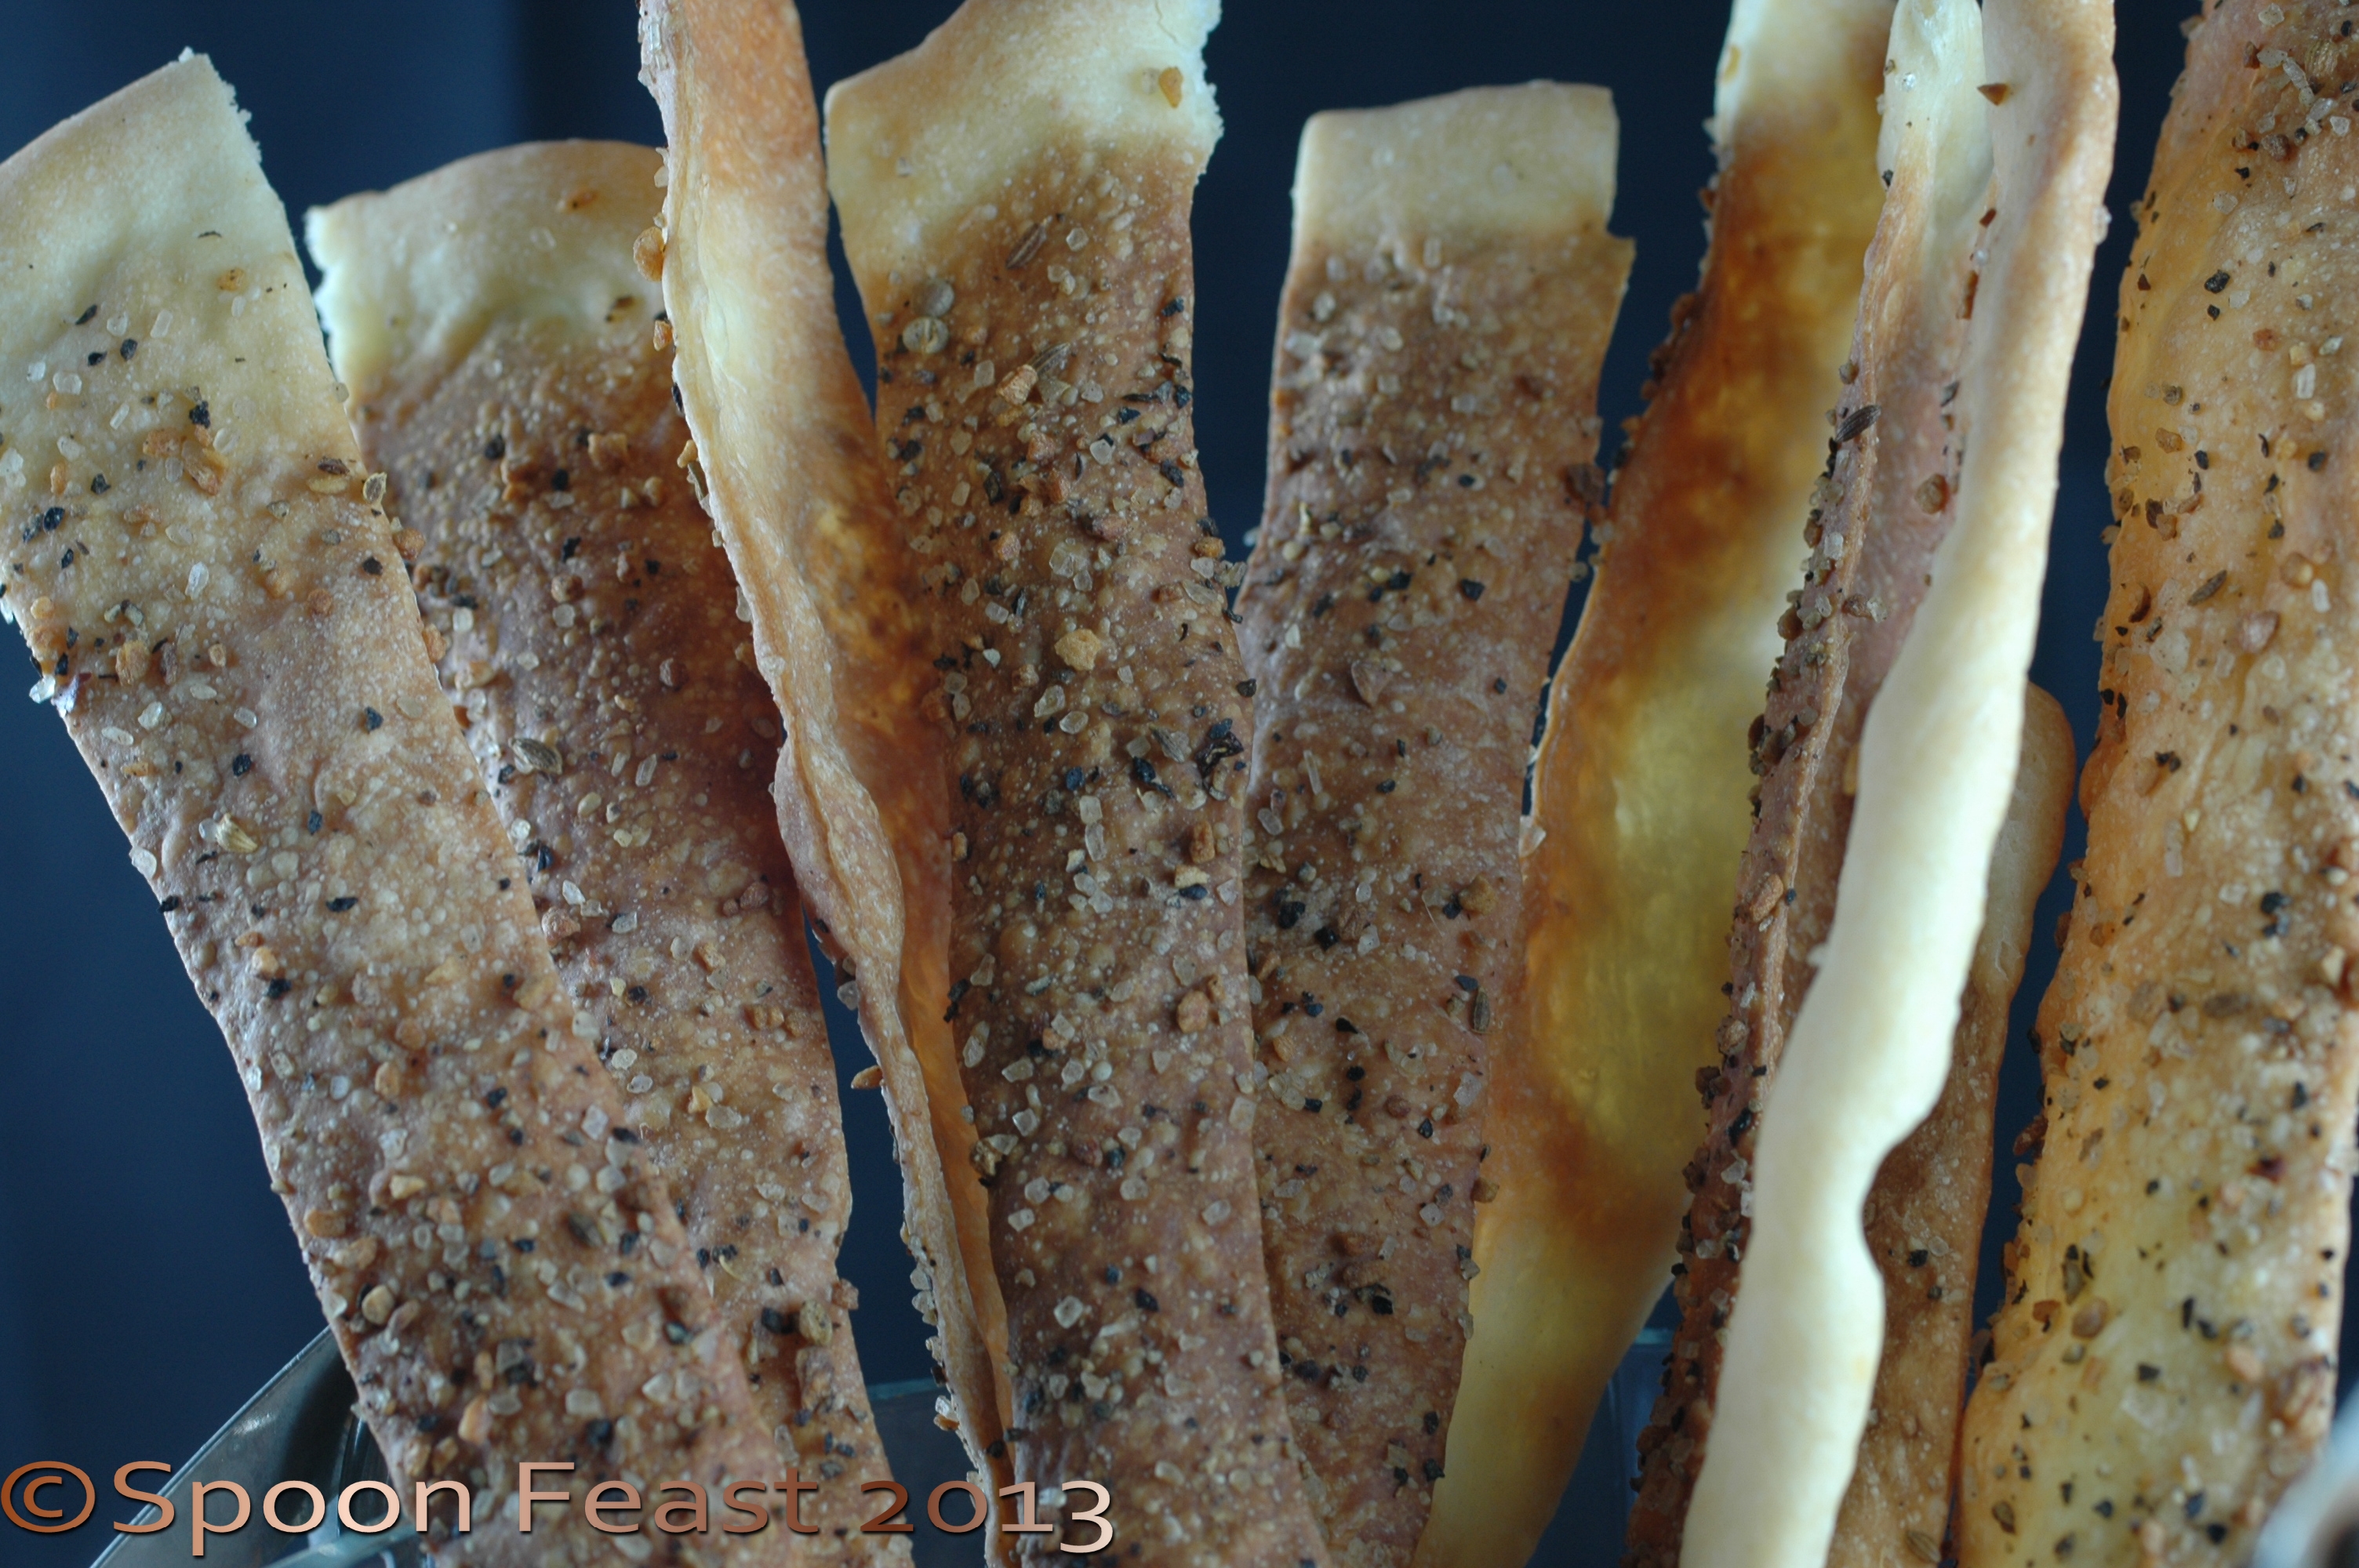
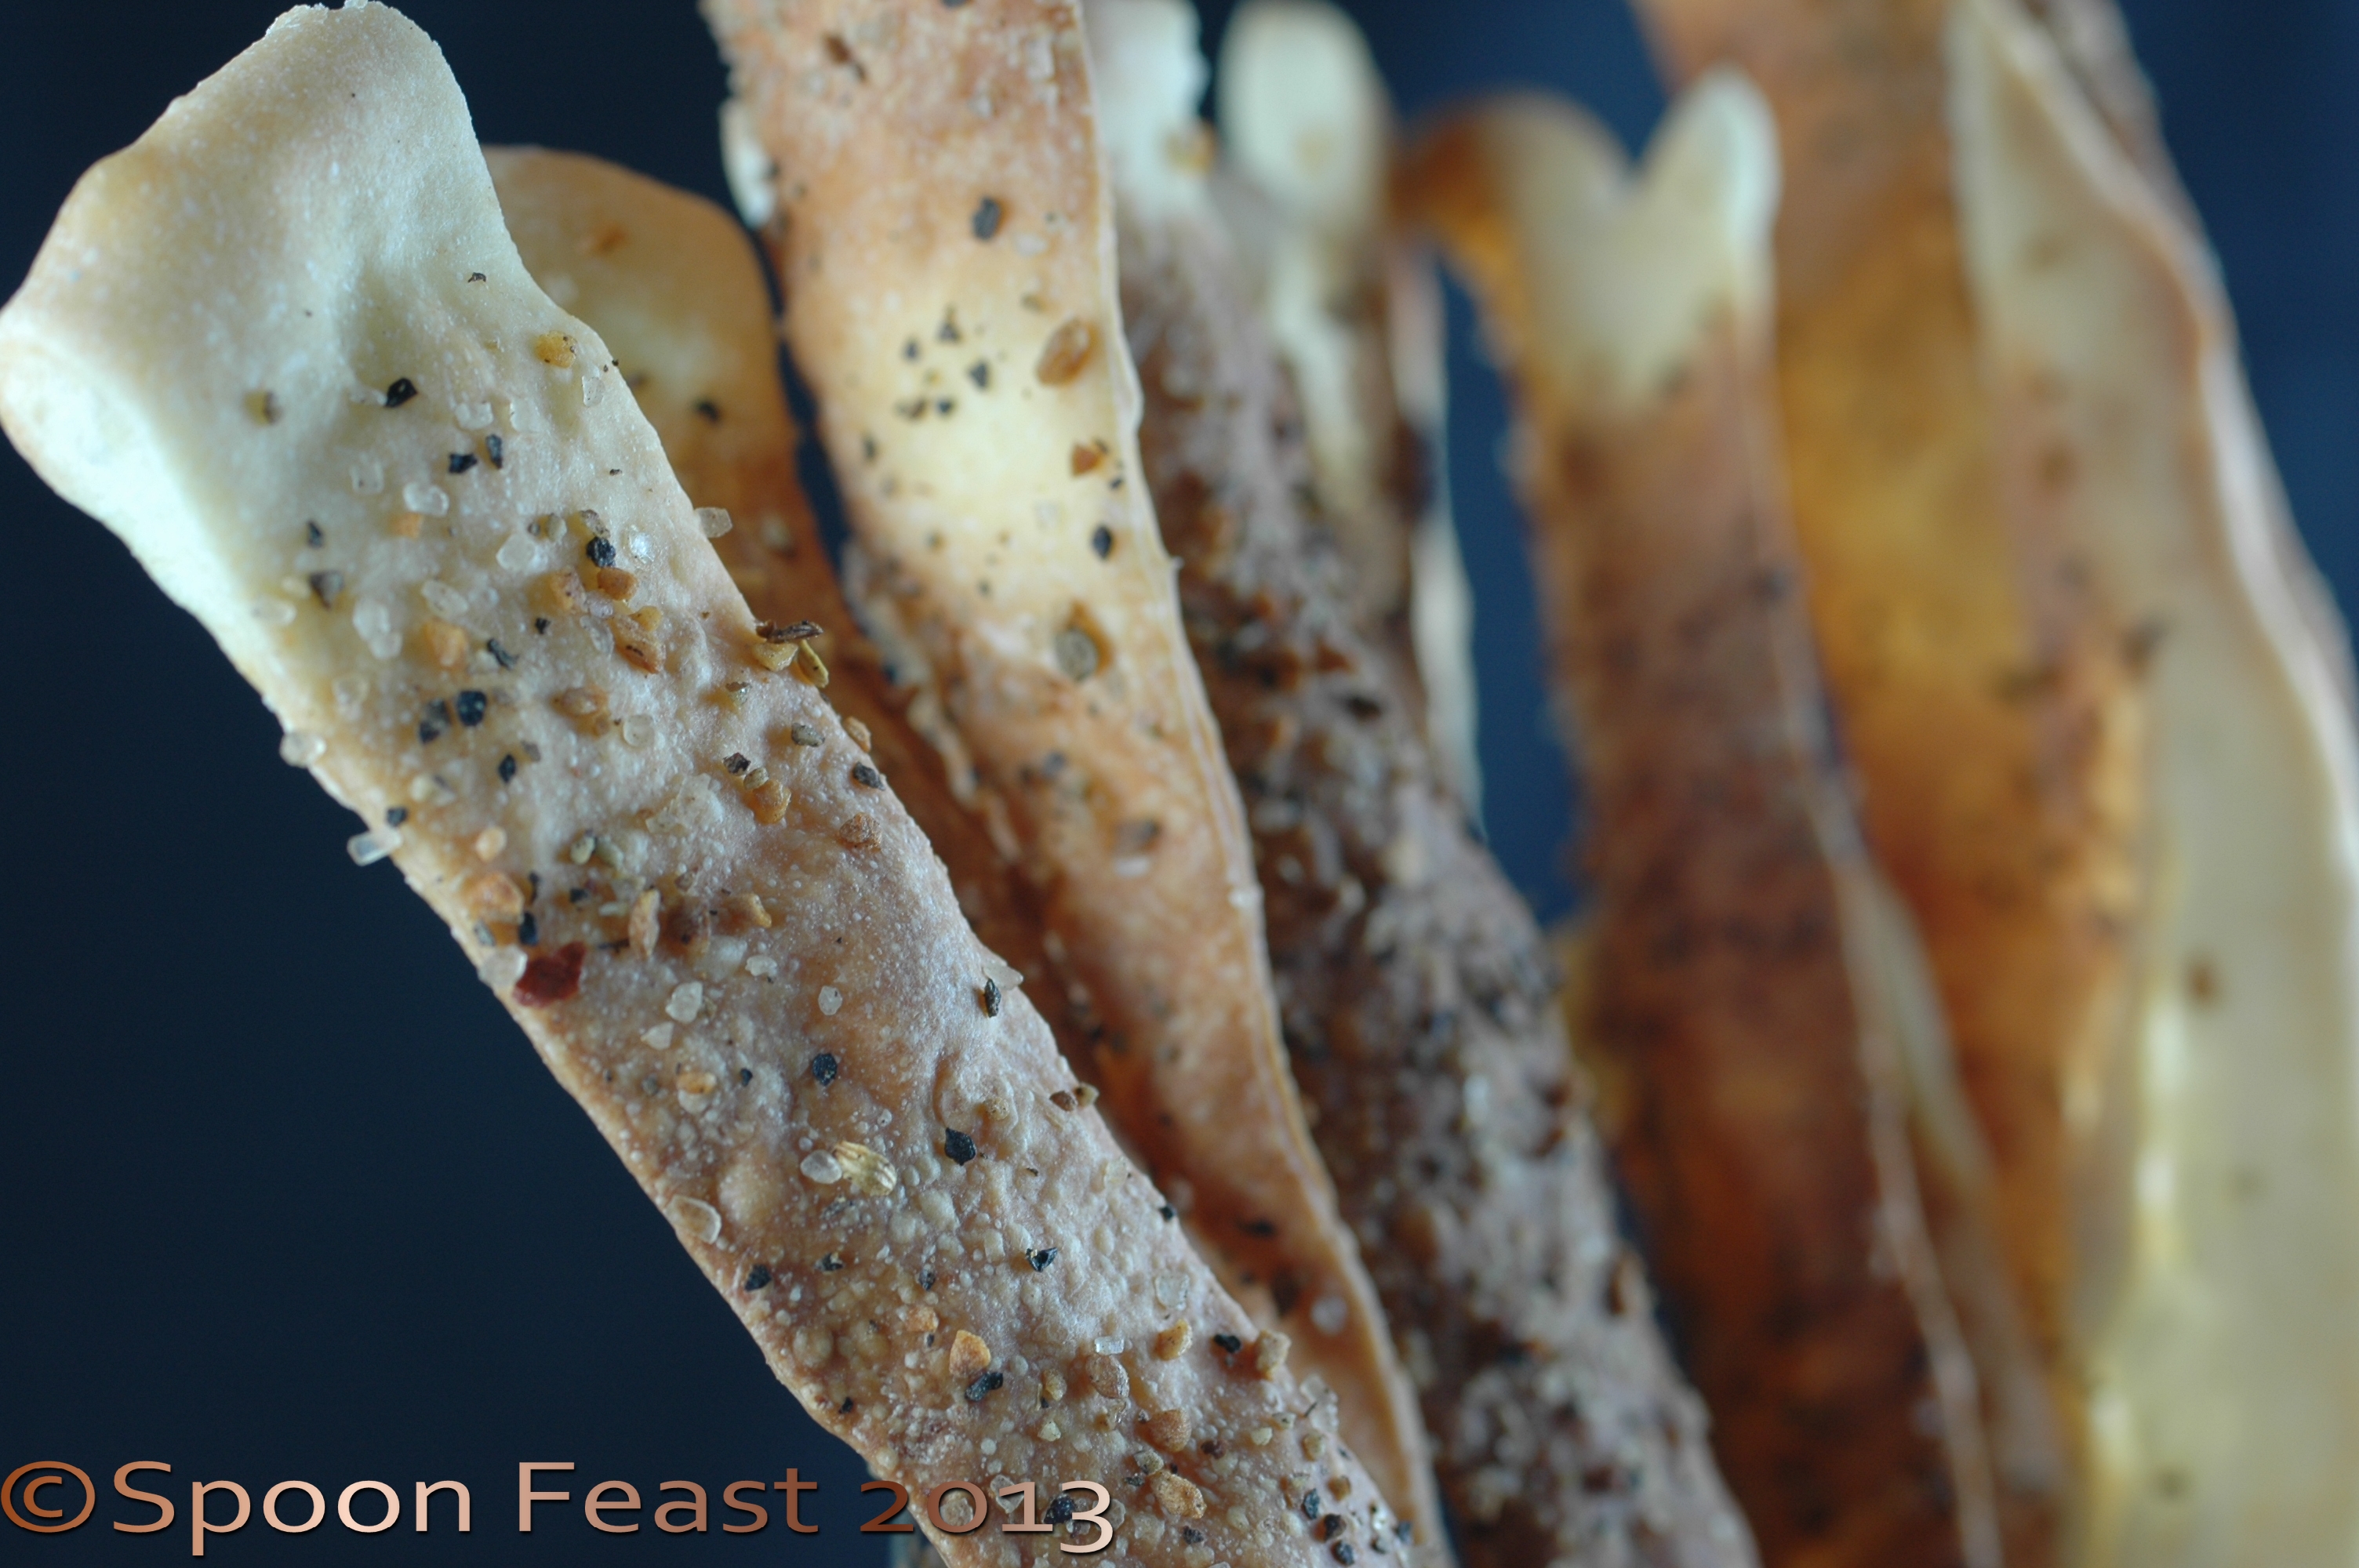
Socca are flat breads from the Nice area of France. Made with garbanzo bean flour, cooked in a screaming hot oven until they blister and brown, sprinkled with salt, pepper and sometimes a bit of olive oil, these tasty bits are simply delicious.

I call these “sorta socca” because I use different kinds of flours and add seasonings and herbs to the mix before cooking. Traditional socca are simply flour, water, oil and salt.

David Lebovitz writes a great recipe for socca in his book Sweet Life in Paris and has another post about it on his blog. Check those out too. He gives some great information. For the most part, this recipe is based upon Davids recipe.

For these “Sorta Socca” you  will need:

  • 1/4 cup brown rice flour
  • 1/4 cup chestnut flour
  • 1/2 cup garbanzo bean (chick pea) flour
  • 9 ounces water
  • 3/4 teaspoon kosher or sea salt
  • 1/2 teaspoon herbs de Provence
  • 1/8 teaspoon ground cumin
  • 1/8 teaspoon onion powder
  • 1 1/2 tablespoon olive oil

Final seasonings: Freshly ground black pepper, sea or kosher salt, slight drizzle of olive oil which is totally optional.

Special equipment: Sturdy heat-resistant pan such as cast iron or steel. I use a crepe pan I bought in Paris and it works great! Just be sure there are no plastic handles on the pan you choose. A sturdy tart pan would work well, cast iron, although heavy, is ideal.

Here is some advice: if you go researching recipes and cooking methods you will find some call for cooking in a 450°F oven for 10-12 minutes. Please take my advice and realize this is not hot enough.

Use the broiler on high or use your grill if you can get it that hot.

To prevent the oil from burning on the pan, as it would if you were to pre-oil and then pre-heat the pan under the broiler, oil it just before you pour in the batter.

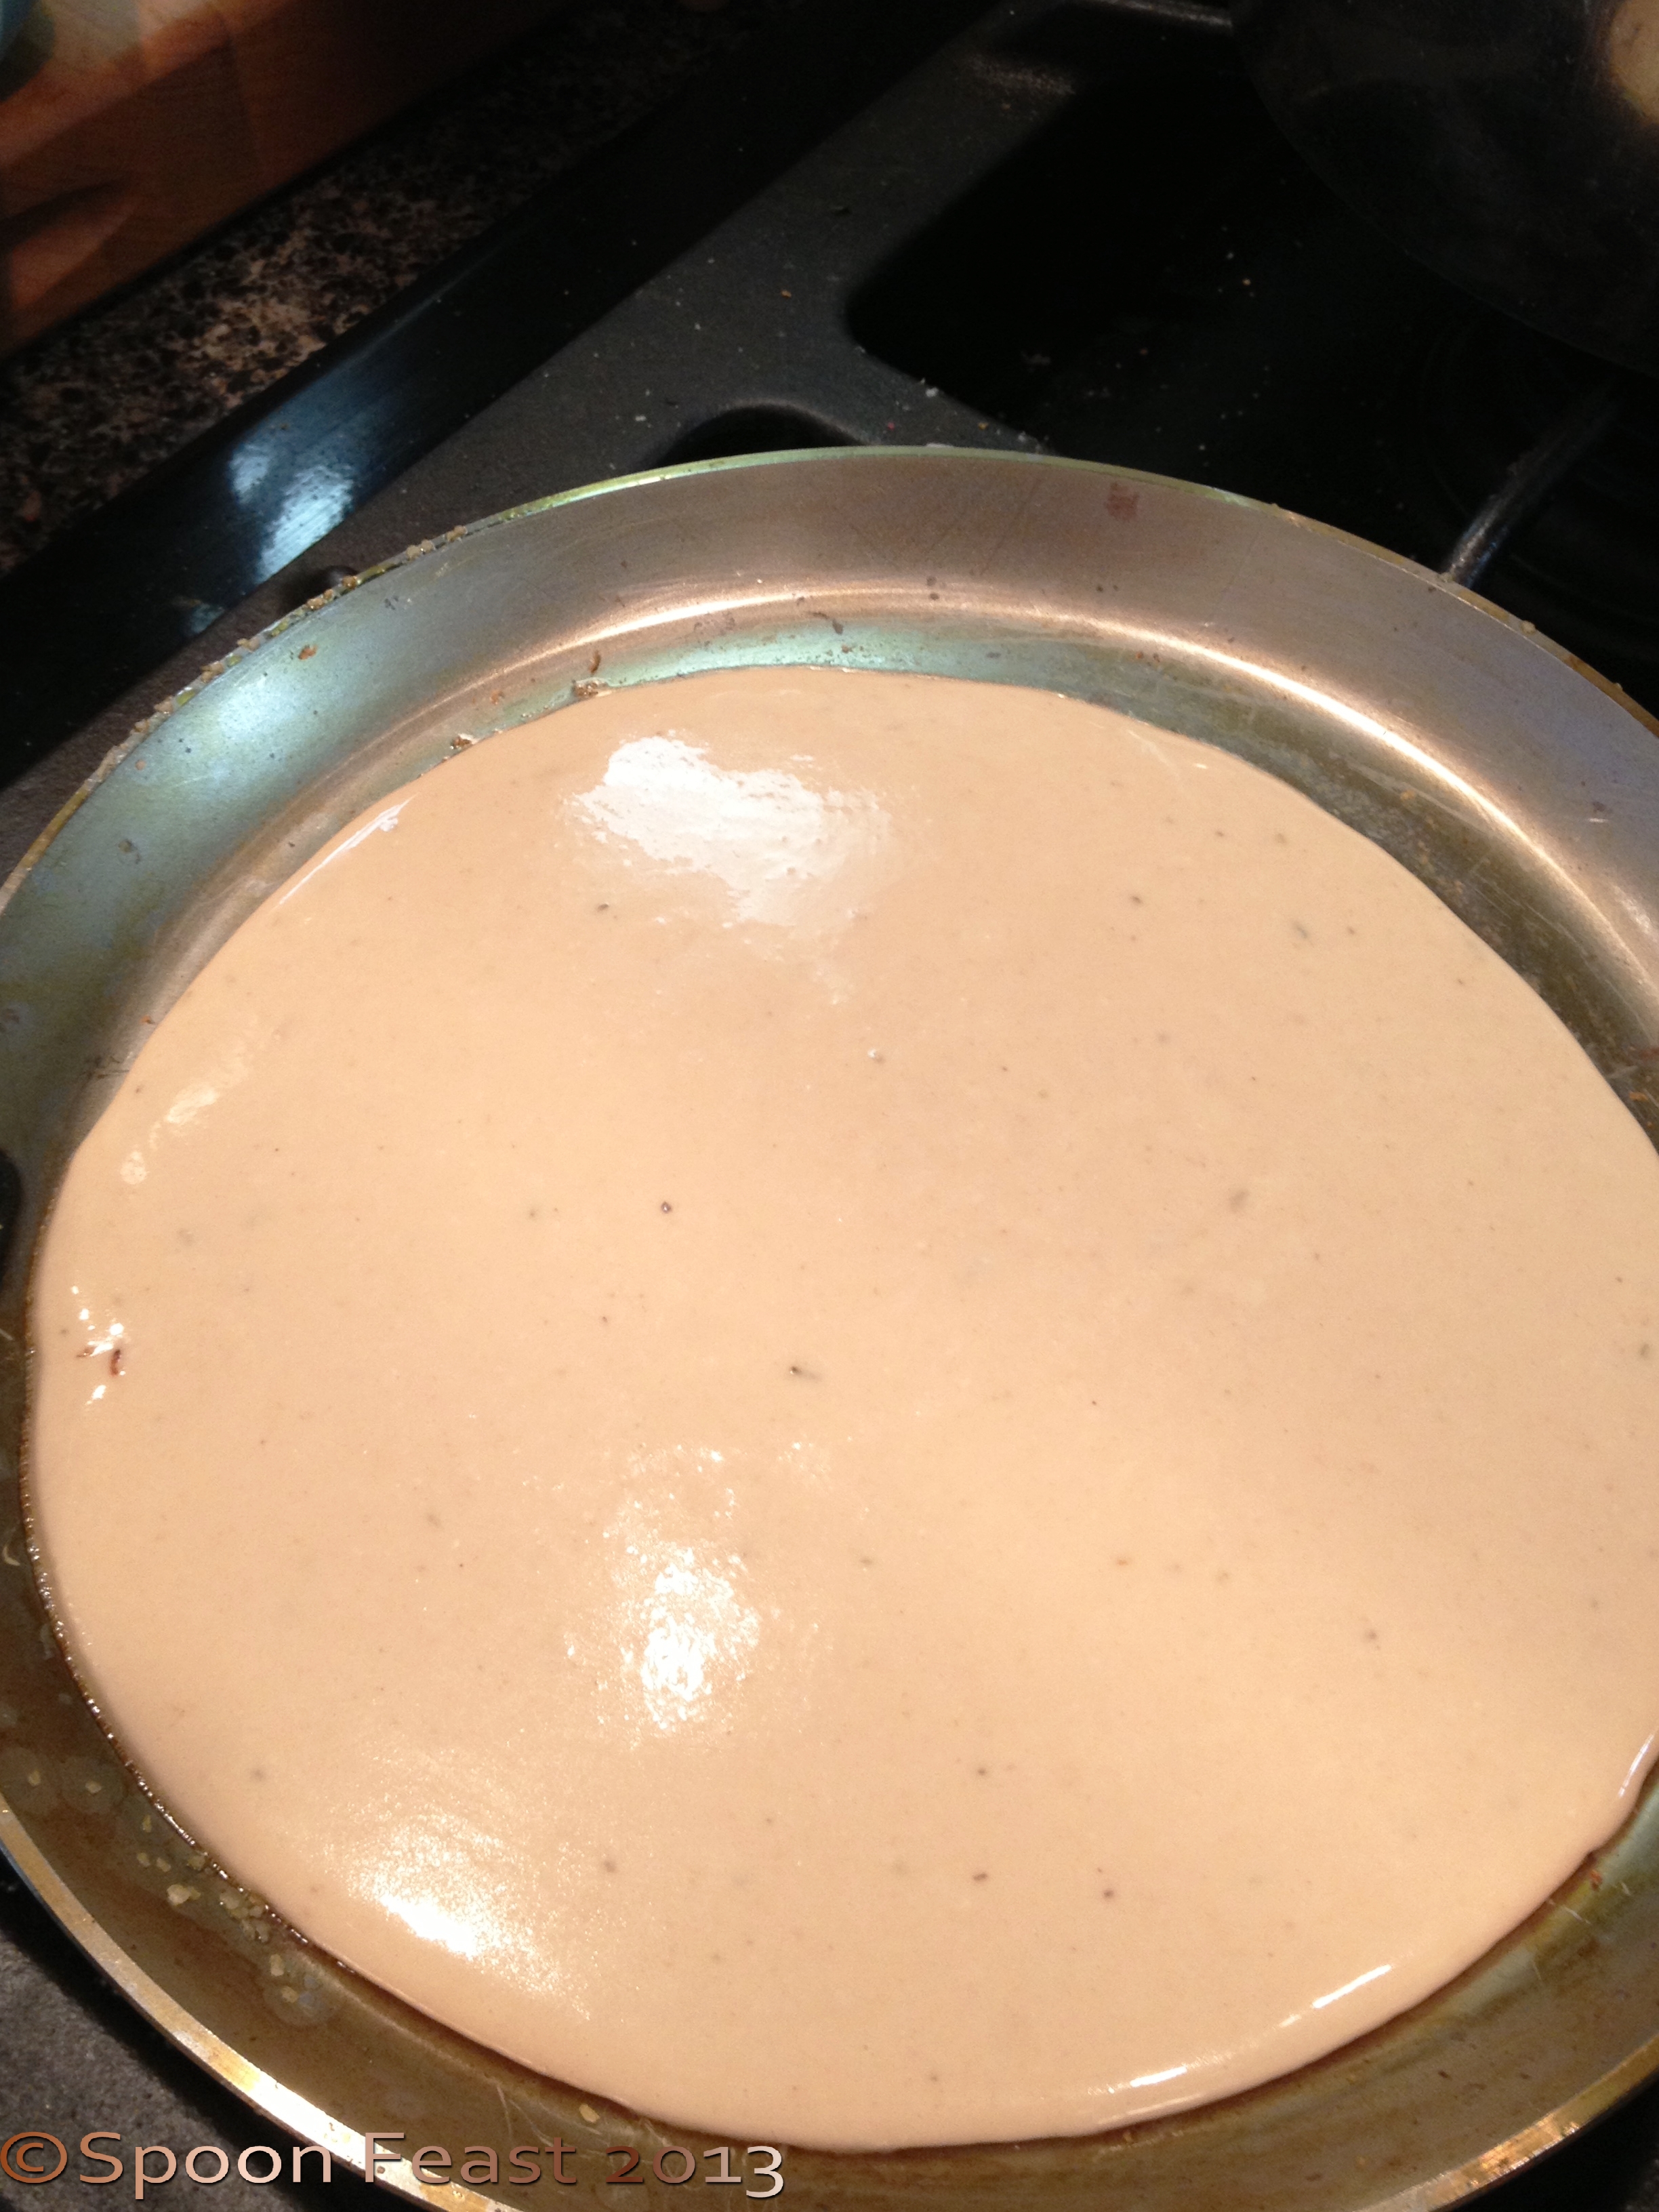
Mix all the ingredients together and allow the mix to sit for a couple of hours. This allows the flours to hydrate.

15 minutes before you are going to cook the socca, turn on the broiler and place the pan in the oven to get screaming hot.

Be SURE to use a good hot mitt or strong towel to handle the hot pan. Avoid getting burned! (Celia at Fig Jam and Lime Cordial suggests using welding mitts for managing very hot things in the oven)

Pour the batter into the hot pan

Pour the batter into the hot pan

When the oven and the pan are really hot, pour enough batter into the pan, swirl it around and place the pan back under the broiler. Make sure there is room for the socca to rise while it is under the broiler, if it touches the heat source, it will burn.

You will see the dough puff and begin to turn brown. This only takes a few minutes and how long depends totally upon the strength and heat of your broiler.

The socca is done when it is dark brown to black around the edges and the top has golden brown spots.
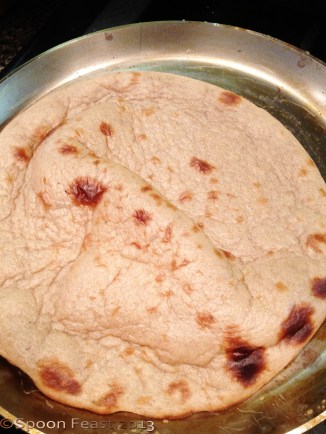
Done!

Done!

Remove from the oven, place the socca on a cutting board, sprinkle with salt and fresh black pepper and a drop or two of olive oil.

Socca is meant to be rustic so either tear it into serving portions or cut it into wedges.

Put the warm socca on a rack to cool so it does not become soggy.

Sprinkle with seasonings, a little goes a long way

Sprinkle with seasonings, a little goes a long way

Sometimes I’ll re-warm any left-over socca by placing it on a hot pizza stone on the oven for a few minutes. This tastes so good warm!

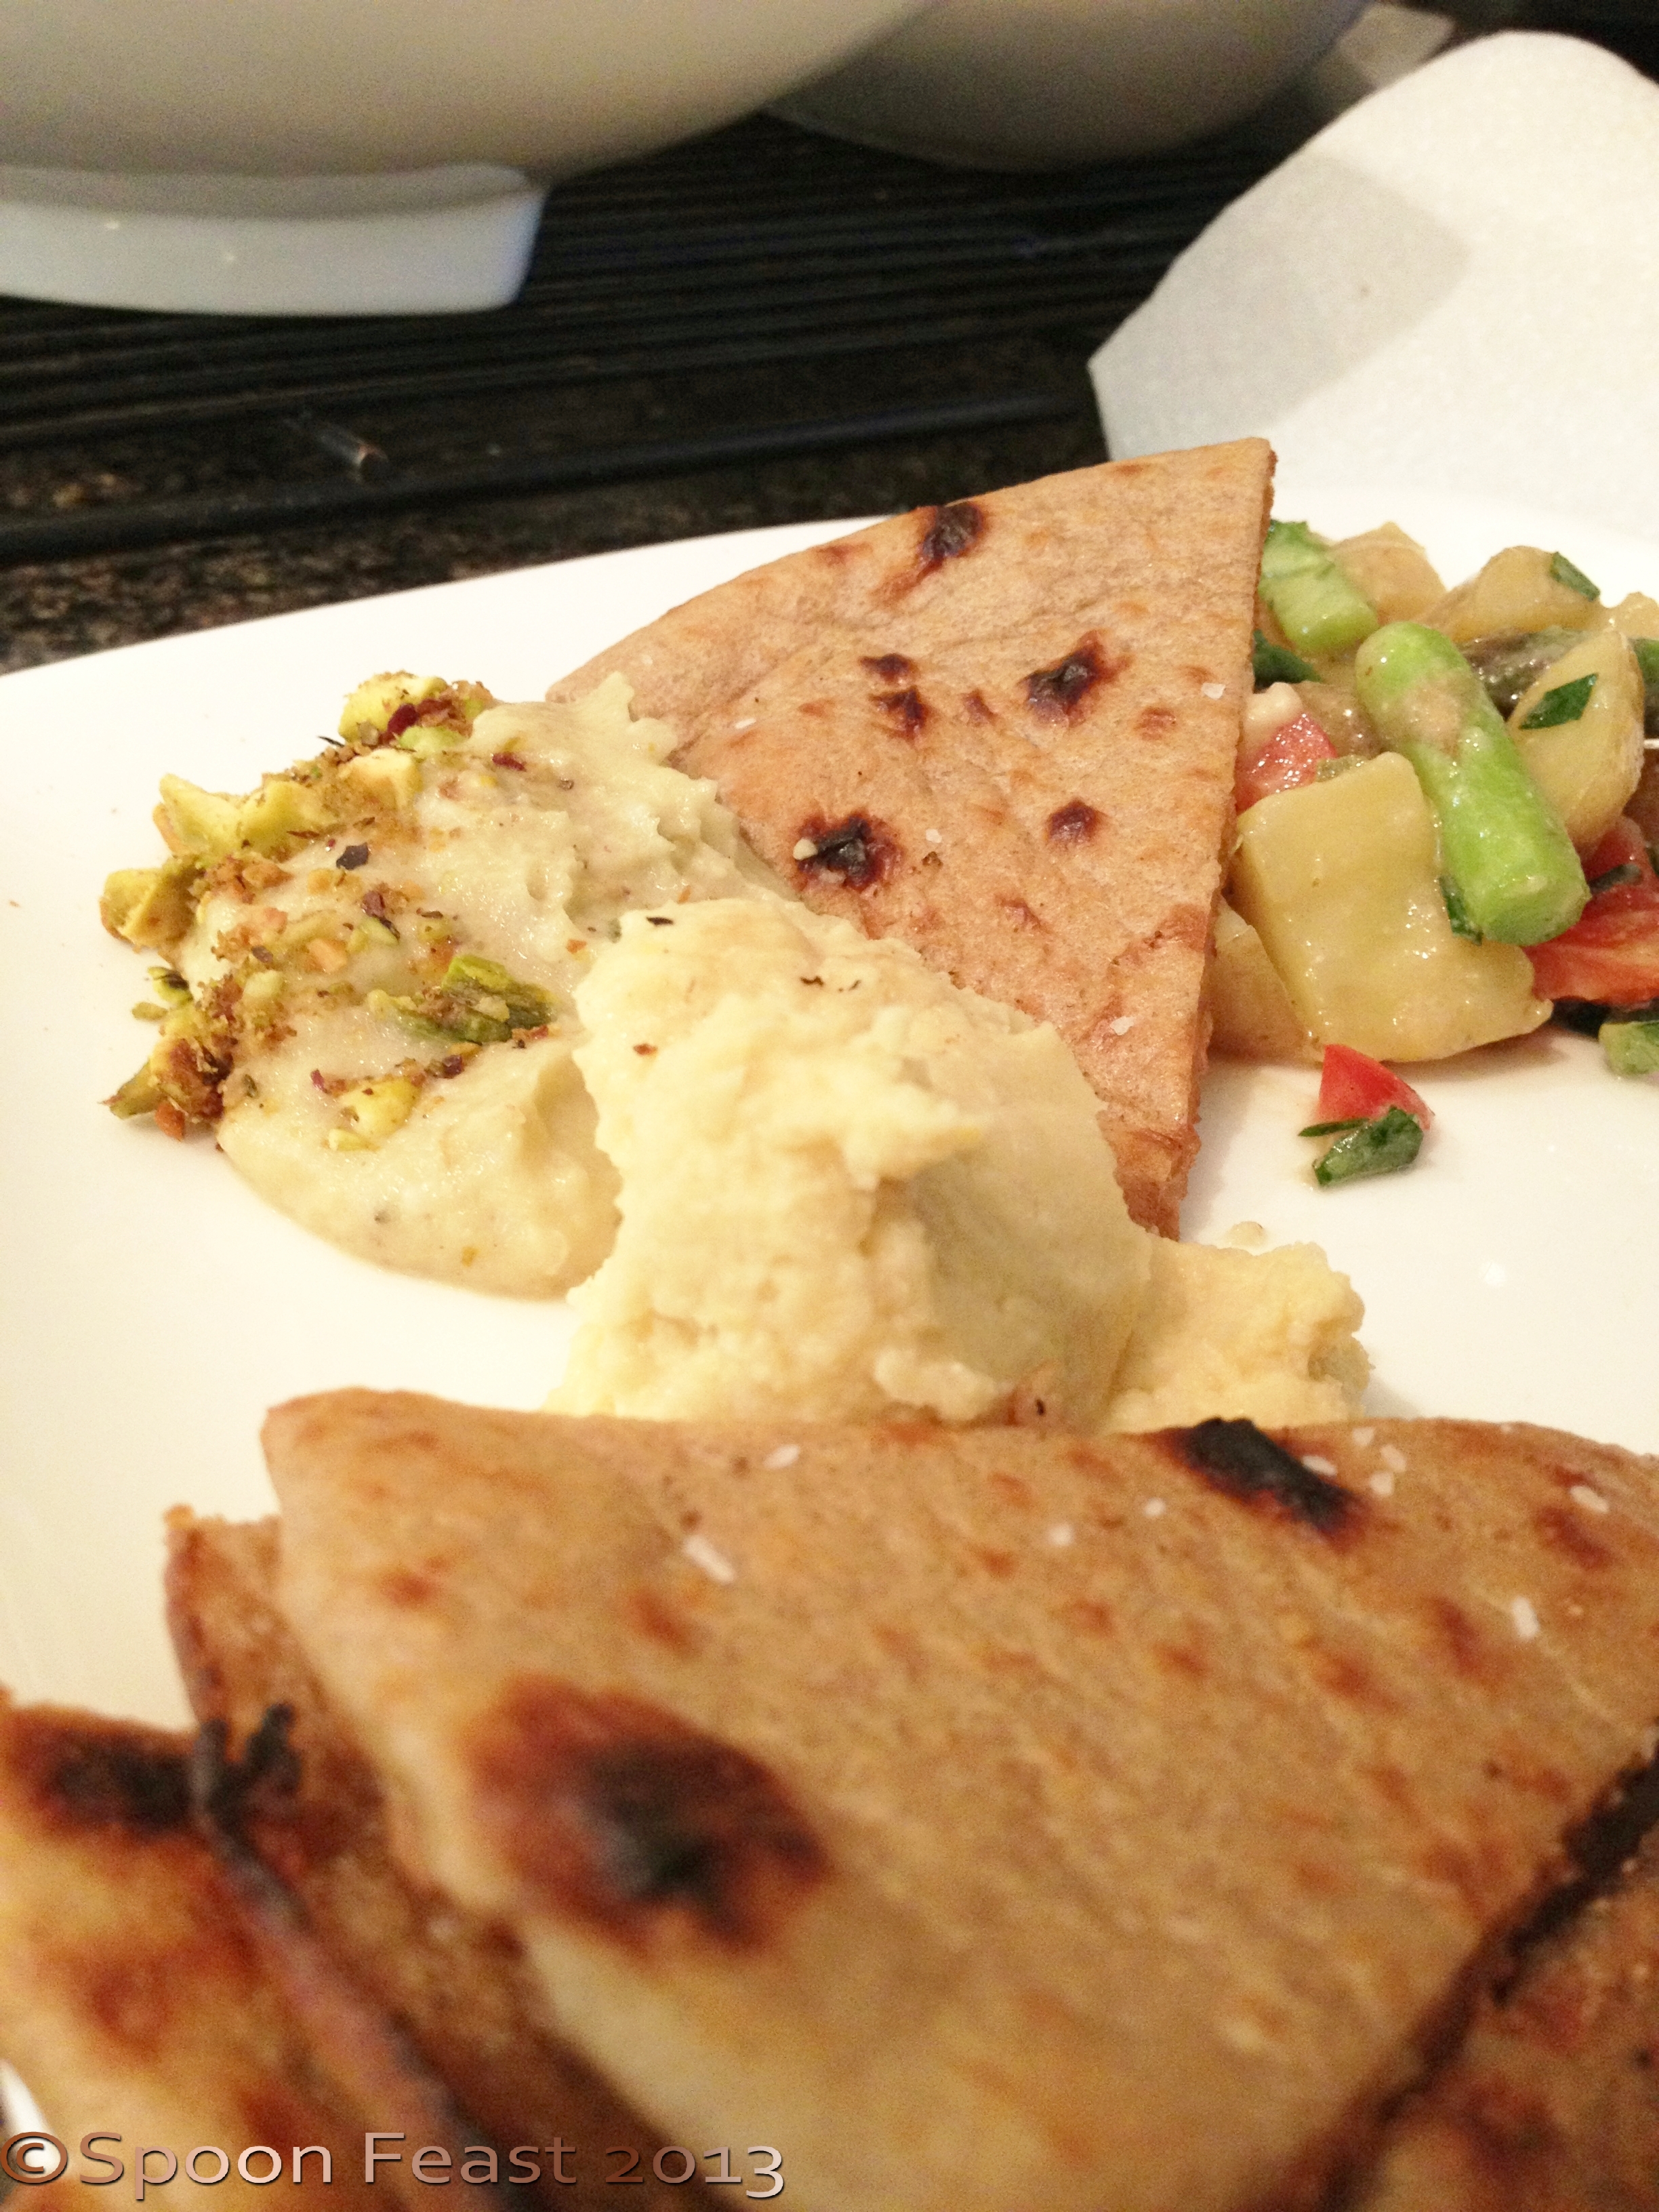
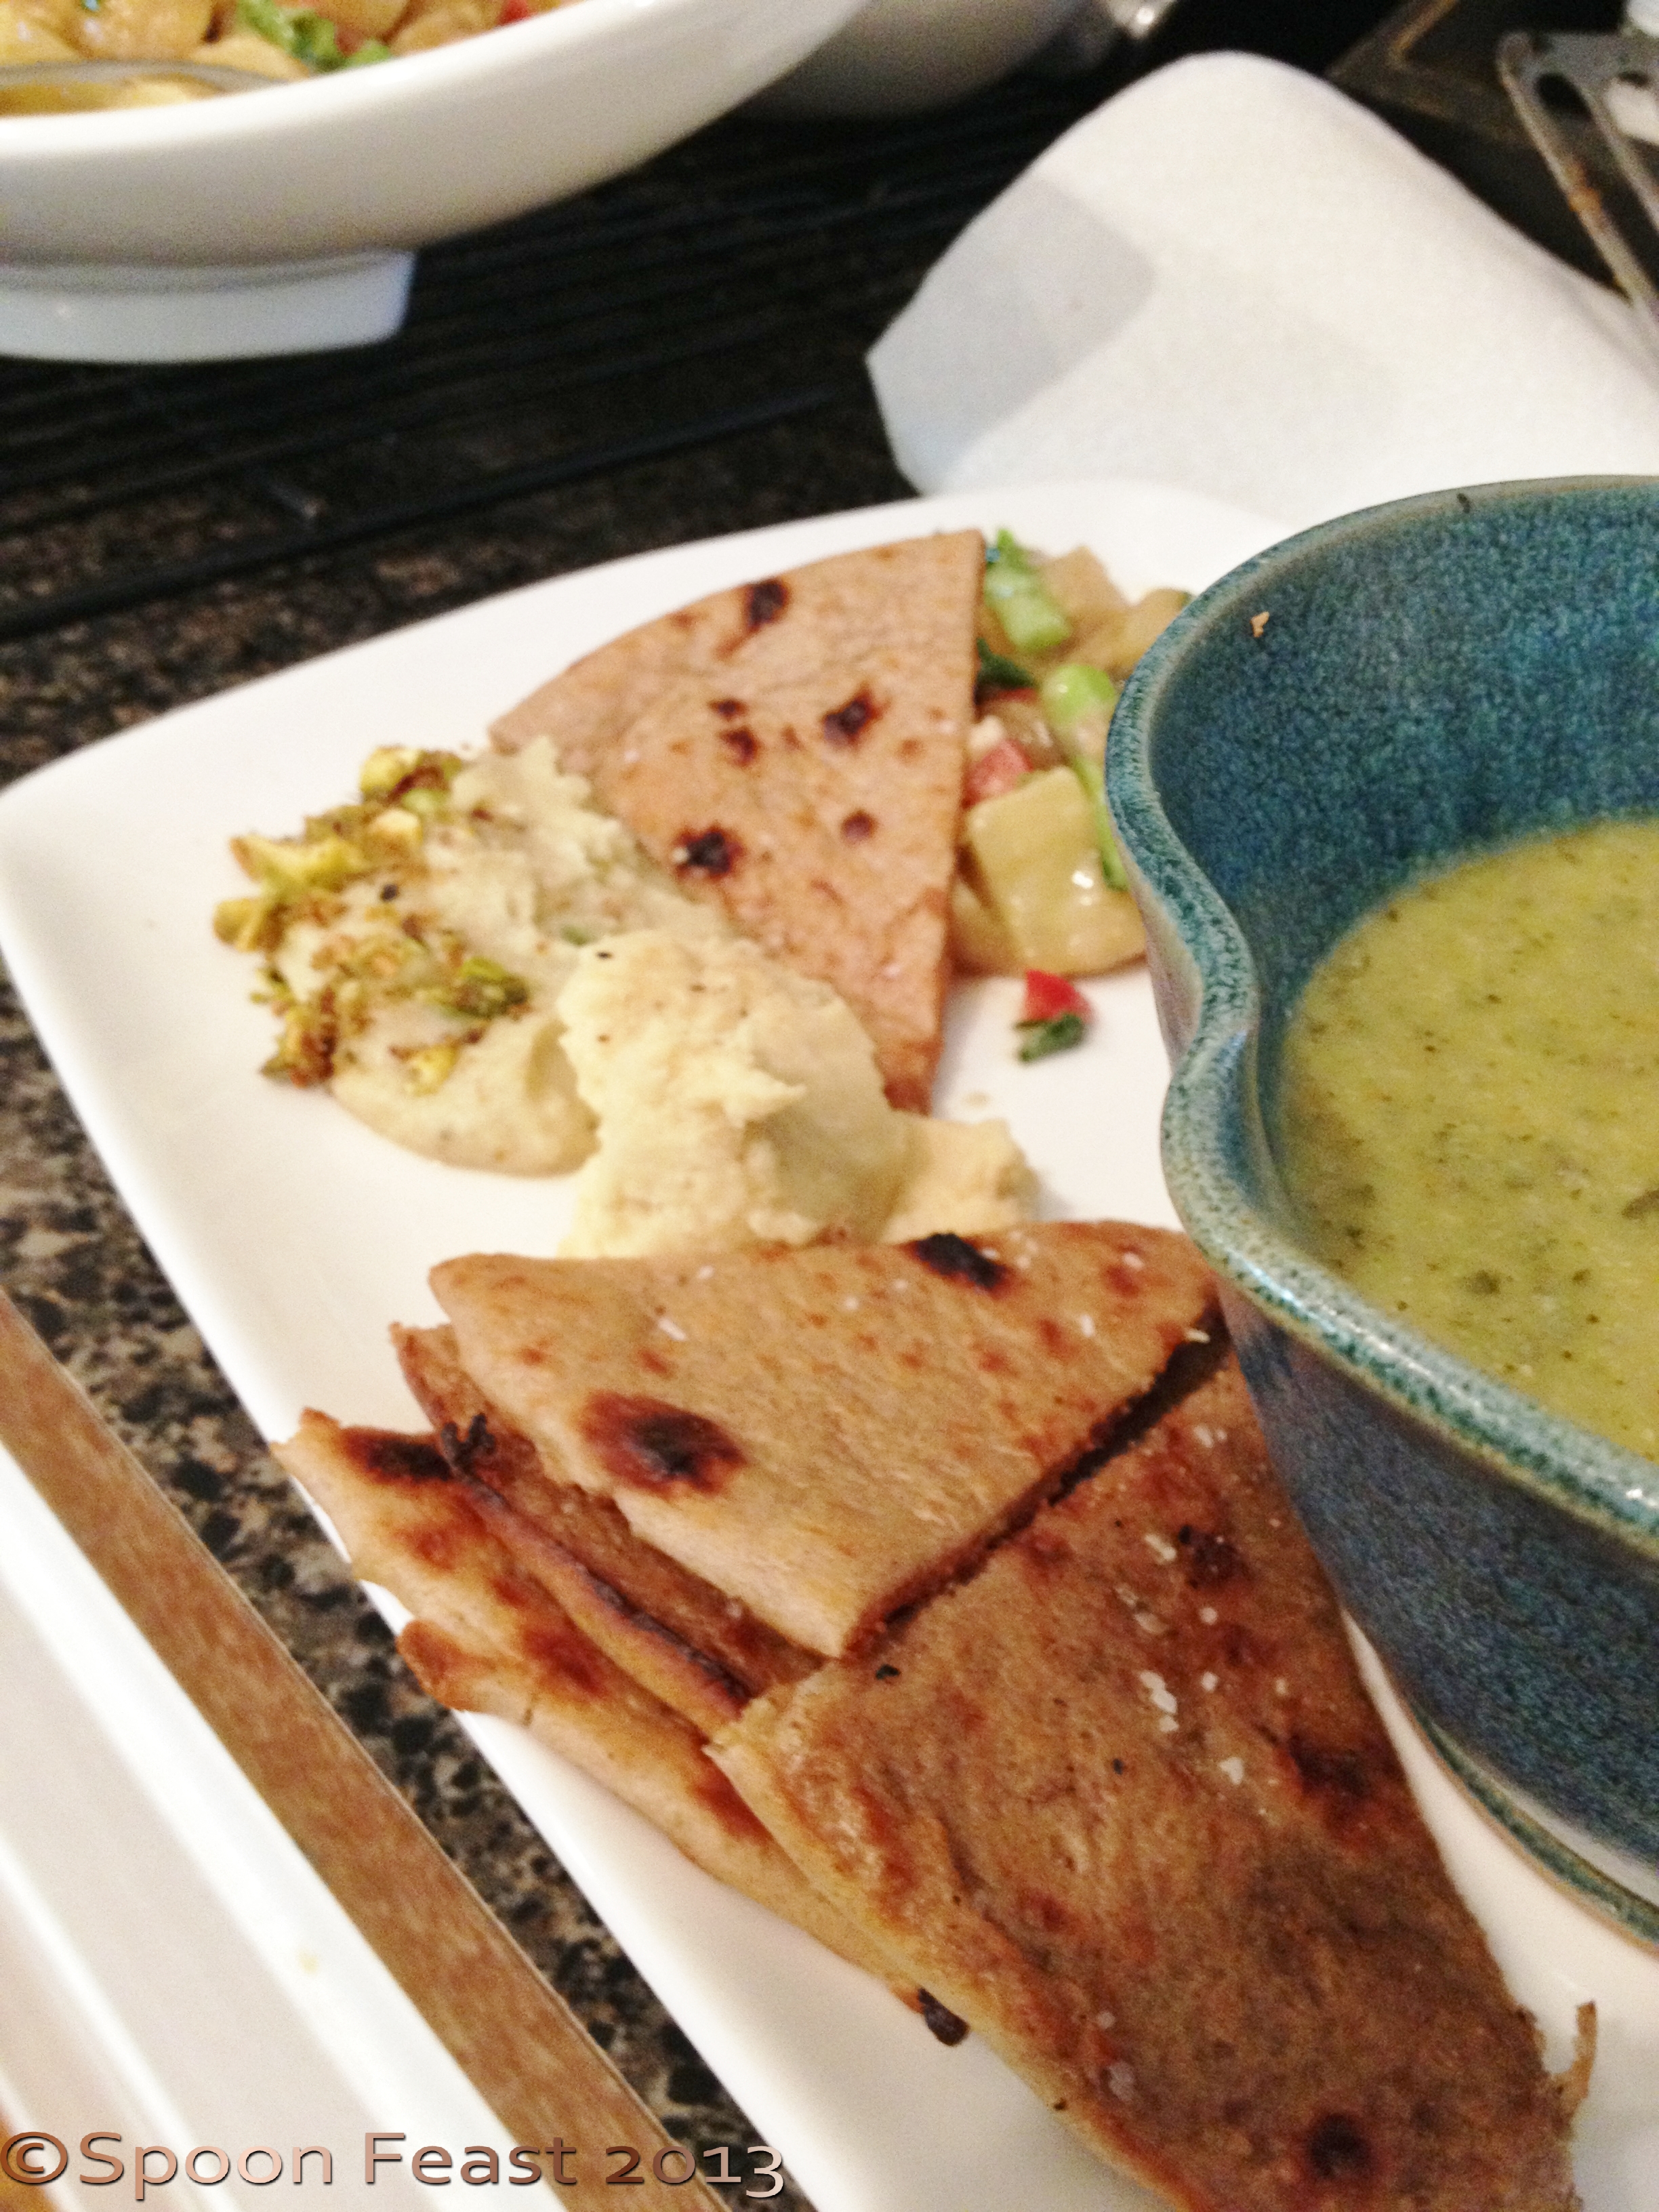
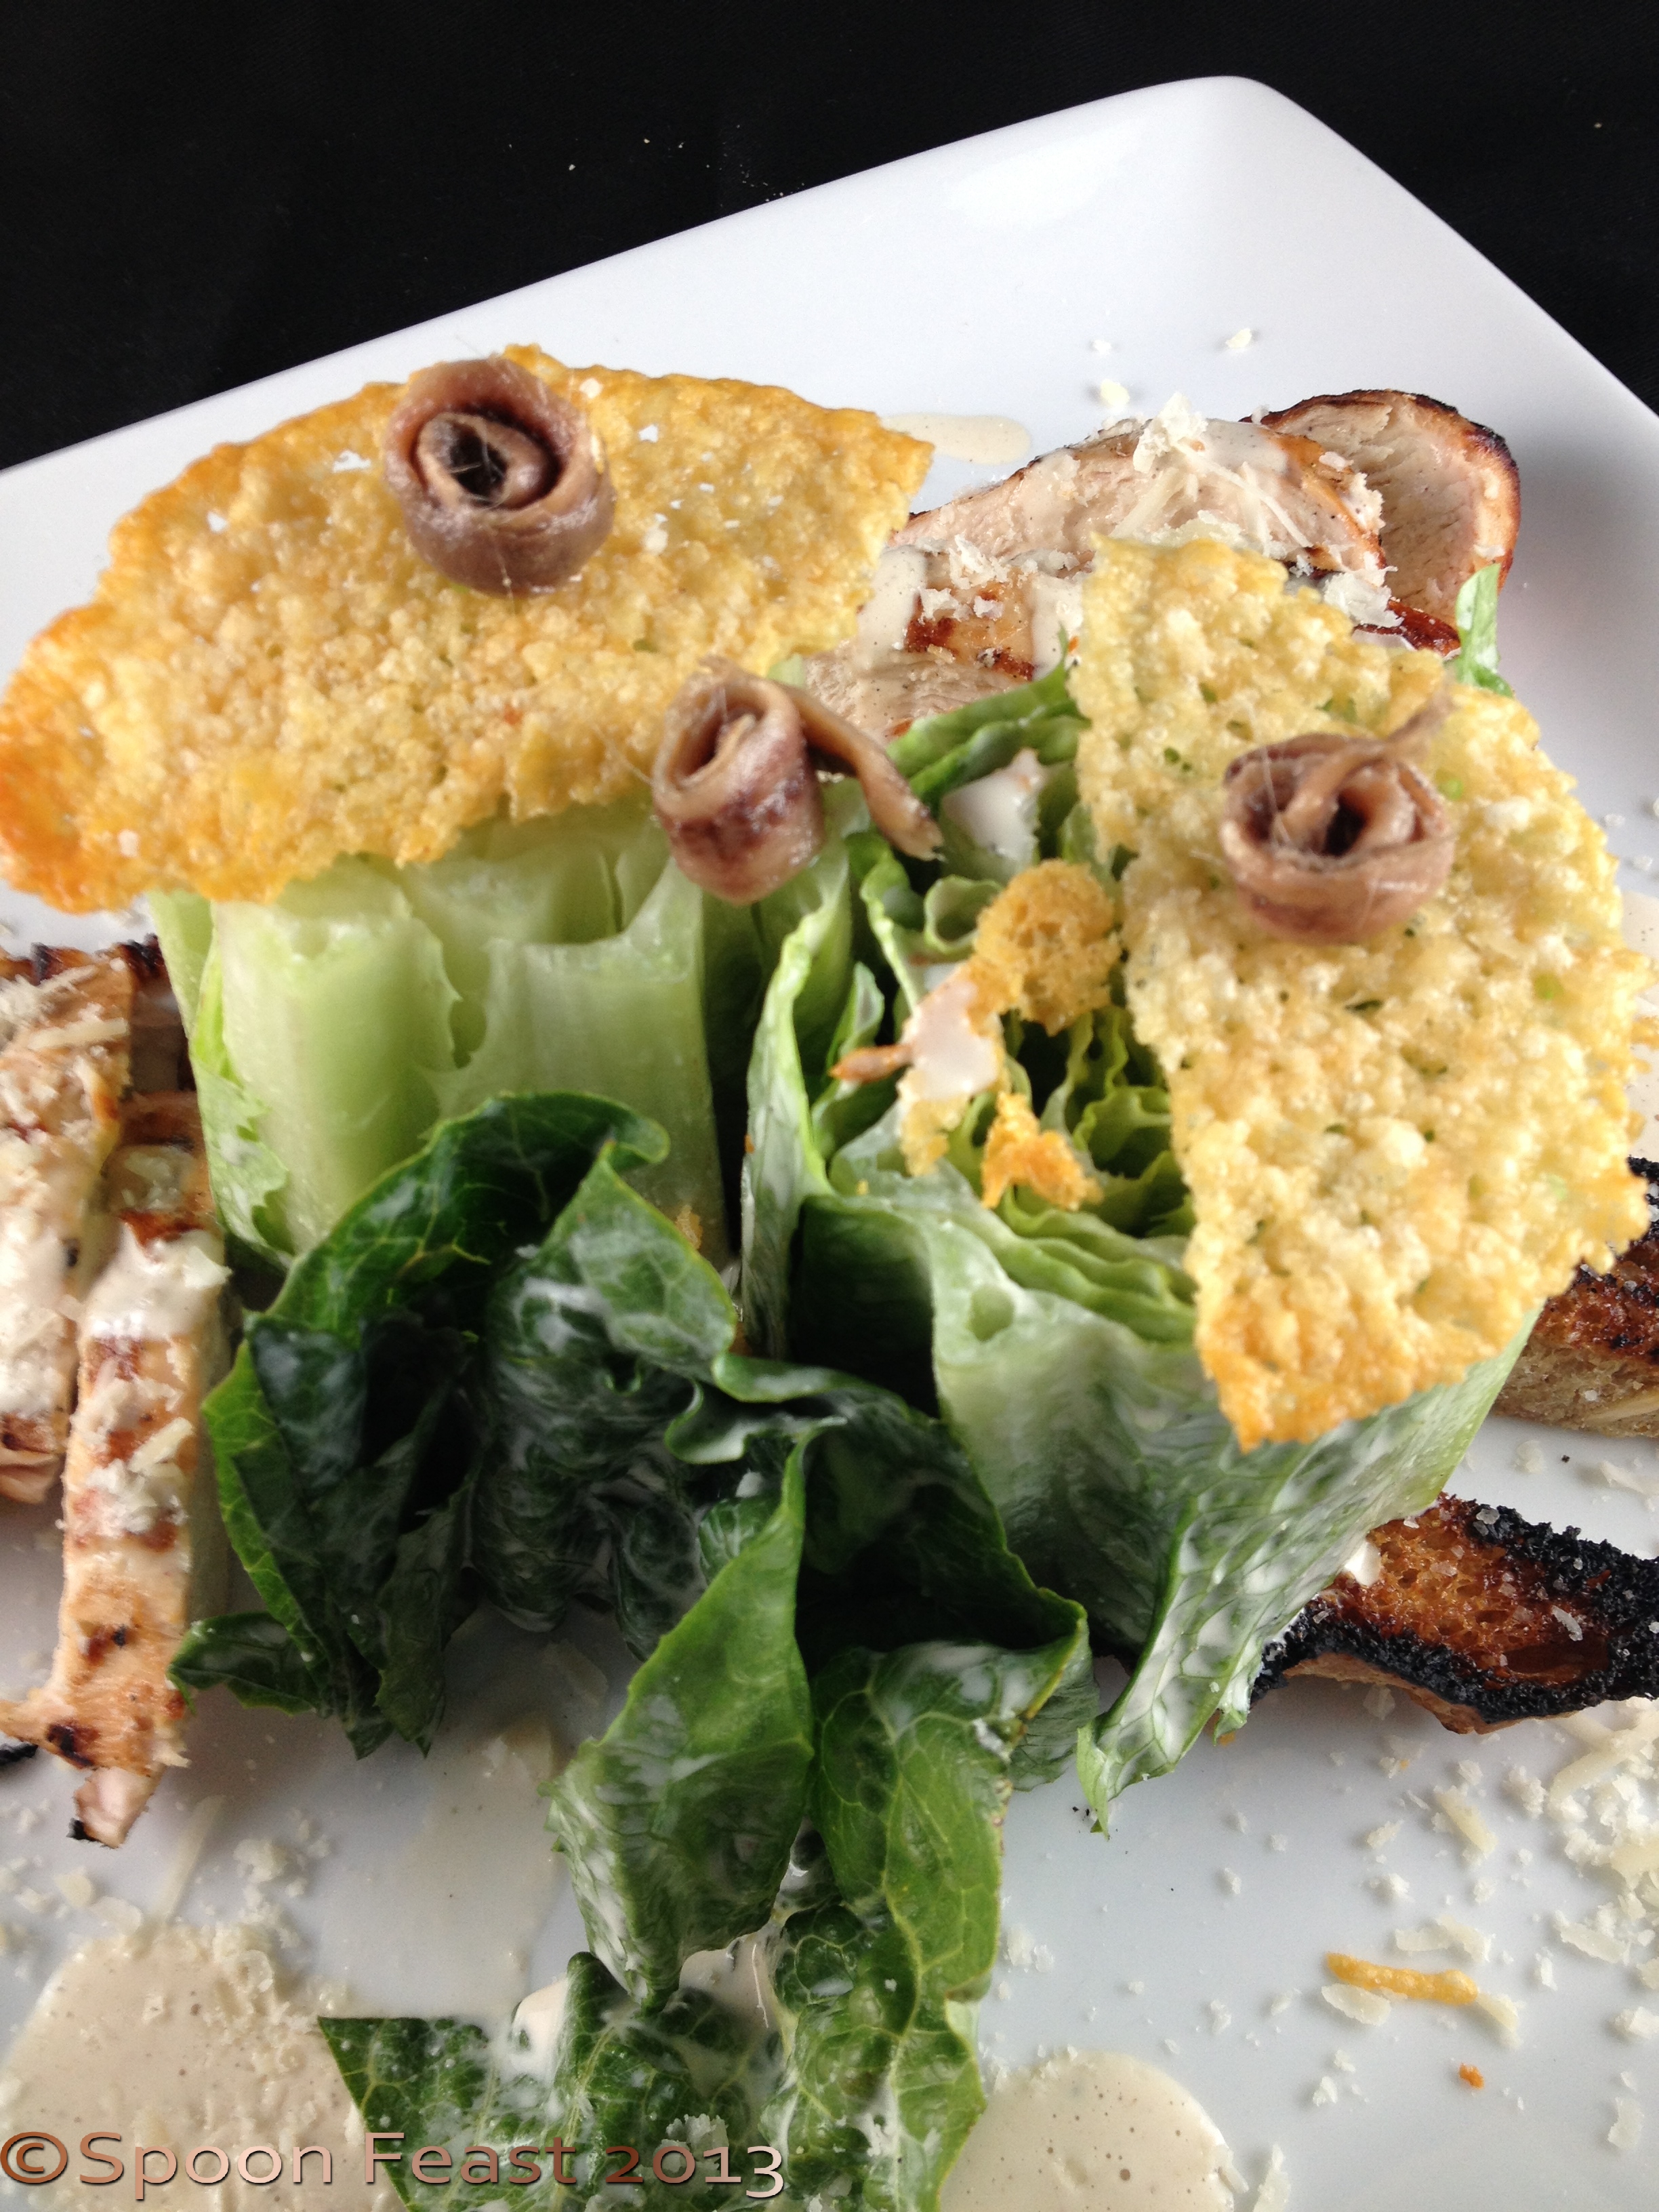
Today’s socca was served with lemon hummus, baba ganoush and cabbage cruciferous soup.

If you have no idea what socca is, try it.

I encourage playing with flour mix. While traditional socca is made with garbanzo bean flour, you can mix it up a bit with other flours too. An added bonus is this is also gluten-free unless you decide to use some wheat, rye or barley flours.

If you do know what socca is, while not quite the same as the street food in Nice, this comes pretty close.

Socca with soup, hummus and baba ganoush

Socca with soup, hummus and baba ganoush

Simple (And Great Tasting!) Bean Burger

Bean Burger

Bean Burger; Can you see it under the mushrooms and onions? I had to take the picture before Robert got to the table and didn’t have time to “present” the burger for photos.

This simple and great tasting bean burger is quite simple to make and is versatile enough to become many things besides burgers.

  • 1 15-ounce can dark red kidney beans
  • 2 cups cooked old-fashioned oatmeal
  • 1 tablespoon dried vegetable flakes (optional)
  • 1 teaspoon minced garlic
  • 1 teaspoon minced onion
  • 1/2 cup ground pistachio or almond meal
  • 1 tablespoon Bragg’s liquid aminos (the salt)

Start by cooking the oatmeal. Include the garlic, onions and dried vegetable flakes if using for flavor.

Drain the beans, rinse and add to the oatmeal.

Combine the oats and beans and all the seasonings

Combine the oats and beans and all the seasonings

Process the mixture in a food processor until things are coarsely chopped up. You do not want to make a paste.

Coarsely chop

Coarsely chop

Form burgers using a scoop for even sizes.

Scoop for even size

Scoop for even size

Pat the burgers with additional pistachio or almond meal to ‘dry’ the outside of the burger. This will allow it to become nice and golden brown.

Using a very small amount of coconut oil or olive oil in the bottom of a saute pan (or use a non-stick pat and go fat-free) place the bean burgers into the hot pan, being careful not to overcrowd the pan.

Saute them until golden brown on one side, flip and cook on the other side until golden brown too.

You can finish cooking them in the oven or hold them in the oven until you are ready to eat.

Delicious Cooked Bean Burgers

Delicious Cooked Bean Burgers

Remove the burgers from the saute pan and then add sliced mushrooms and sliced onions, saute for 2 minutes, then add 1-2 tablespoons of water, continue cooking until the water is evaporated.

Serve the sautéed onions and mushrooms over the bean burgers.

This evening, we served them on a bed of fresh spinach with a side Caesar salad. I couldn’t eat it all!

If you have leftovers, you can saute the  crumbled burgers with some diced onions, chili powder, cumin and diced tomatoes to make “taco meat”. Fill corn tortillas and finish with your favorite taco toppings.

I find this can be used nearly the same as you would ground meat. Make chili, tacos, casseroles etc.

Enjoy!

Bean Burger topped with sauteed onions and mushrooms

Bean Burger topped with sauteed onions and mushrooms

Lavash – An Easy Cracker to Make

Lavash

Lavash

Lavash is such an easy cracker to make I think if more people knew how, more people would make them.

So here goes my attempt to teach everyone how to make Lavash.

Here is another added bonus, this recipe also makes great pita bread! Just weigh the dough balls to 4 ounces and roll it to 1/4 inch think.

Bake them on a baking stone in a 500°F oven. (Yeah, that’s HOT!) Place the dough disks onto the baking stone, wait for them to poof and begin to brown. Remove them to a cooling rack to cool. Lovely pita!

Sometimes I’ll make two 4-ounce pita and roll the rest out into lavash. Sometimes it’s all lavash others, all pita. Either way , this is a great formula and it comes to you by way of Peter Reinhart’s book, The Bread Bakers Apprentice, which if you don’t have it, I highly recommend it. But only if you like to bake bread.

OK!

Back to Lavash!

  • 1 1/2 cups bread flour
  • 1/2 teaspoon kosher salt
  • 1/2 teaspoon instant yeast
  • 1 tablespoon vegetable oil
  • 1 tablespoon honey
  • 1/3 to 1/2 cup room temperature water
  • Spray bottle with water (hopefully you have one dedicated to baking!)

DSC_0021Some topping suggestions:

  • Sesame seeds, both white and black
  • Poppy seeds
  • Cumin and caraway seeds
  • Sweet and/or hot Paprika
  • Kosher salt
  • Montreal Steak Seasoning
  • 7 seed mixtures

To make crackers:

Put all ingredients into a bowl of an electric mixer, add enough water to bring everything into a ball. You may only need 1/3 of a cup or you may need all the way up to 1/2 cup. If you need more than that, add it only 1 Tablespoon at a time.

Inf using an electric mixer to knead, knead the dough 6 minutes on medium speed. If kneading by hand, do it for 10 minutes.

The dough should be firm to the touch, satiny and not sticky.

Oil a bowl, roll the dough ball in the oil so it gets a light coating. Place the dough in the bowl and allow to rise for about 1 and 1/2 hours or until it has doubled in size.

If you don’t feel like finishing the crackers now, you can store the dough in the refrigerator overnight at this point.

If you want to make a couple of pita, weight out 2 4-ounce balls, give them an initial roll and set aside to rest.

Line the back side of a sheet pan with parchment paper. (The crackers get baked on the backside of the sheet pan.)

On a lightly oiled or floured surface, roll the dough into a paper-thin sheet. You may need to lift the dough to ensure it isn’t sticking to anything during this rolling process.

If, while rolling, the dough ‘fights’ you by shrinking back, cover it with a clean towel or piece of plastic wrap and allow the dough to rest for 5-10 minutes.

Place the thin dough onto the parchment lined sheet pan. Spray with water and sprinkle on the topping of your choice.

You can cut the dough into crackers or long strips using a pizza cutter before baking. Don’t worry about separating the crackers now, they will snap apart once cooled.DSC_0006

Bake the crackers in a preheated 350°F oven for 15-20 minutes or until they are golden brown.

Freshly baked crackers are a real treat to share with anyone dropping by for a glass of wine and a few nibbles. Don’t be surprised if your Lavash crackers become a topic of interest!

Caesar Salad – A Fresh Look

Caesar Salads have long been popular both in the restaurant scene and at home. I love a good Caesar Salad especially if you add some Caesar Saladgrilled chicken to it and lots of Parmesan cheese.

The dressing here is a low-fat version of a traditional Caesar. This maintains the flavor of the dressing the same as a traditional Caesar dressing, yet with far less fat. So you will find a stray from the traditional Caesar Dressing ingredients, but try this, you’d never know the difference!

Plating the salad becomes a real presentation. Take your time and you will be rewarded with not only a nice visual but also something that will satisfy your taste buds on many levels.

For the Salad:

      • Romaine Hearts – each one makes 1-2 servings; 3 for an appetizer or side salad
          • Keep the lettuce in tact!
  • Good quality bread for the “croutons”
  • Parmesan cheese, shredded or shaved off a block with a vegetable peeler
  • Anchovy fillets – white anchovies are a gourmet treat, but everyday anchovies will do also
  • Dressing (recipe follows)
  • Add Grilled chicken or shrimp if desired.

To make the dressing:

  • 1/2 cup low or non-fat mayonnaise
  • 1/2 cup low or non-fat plain Greek yogurt
  • 1/4 cup shredded Parmesan cheese (use the best quality you can buy!)
  • juice from 1/2 lemon
  • 1 tablespoon Worcestershire sauce
  • 4 oil packed anchovy fillets (or more if you like)
  • 2 cloves fresh garlic
  • 1 -2 teaspoons fresh ground black pepper

Put it all in the blender and process until smooth. Taste it, you may want more anchovy or garlic or cheese. If you do, add it and process again until smooth. If it gets too thick, thin with water.

Wash the lettuce, carefully remove any dirt or debris while keeping the head in tact. Turn the romaine heart upside down to drip dry or pat it dry with a paper towel.

Holding the romaine heart upright in a clean bowl, drizzle the leaves with the dressing, use about 1-2 ounces per heart.

Wrap tightly into a log shape

Wrap tightly into a log shape

Wrap the lettuce tightly in a log shape in plastic wrap. When you do this, arrange the leaves so they don’t break. You want to be able to wrap it together really tight.

Refrigerate for at least 30 minutes.

Brush the bread with olive oil, grill each side for 1-2 minutes.

Roll the anchovy fillets into ‘mini-flowers’.

Make Crispy Parmesan Chips

Rolled anchovy fillets

Rolled anchovy fillets

Make some crispy Parmesan chips by placing freshly shredded (grated cheese does not work) onto a piece of oiled parchment in a circle.

Use a ring mold for even shapes

Use a ring mold for even shapes

Use a ring mold to make even sized circles. Bake them in a 350°F oven for 5-10 minutes or until they turn golden brown.

Remove when the cheese gets golden brown

Remove when the cheese gets golden brown

Remove from the oven and using a spatula, remove them from the parchment immediately as the cheese cools rapidly. At this point, they will retain any shape you give them. but you have to move fast, once they cool they become crisp.

For this presentation, instead of making croutons, I cut the bread into a long rectangle, oiled it and then put it on the grill for a few minutes.

Plate Presentation:

Lay two lengths of bread on the base of the plate.

With the plastic wrap still on the lettuce, slice the lettuce into rounds about 2″ wide.

Slice the lettuce with the plastic wrap still on. Of course, remove it as you bring the lettuce to the plate.

Slice the lettuce with the plastic wrap still on. Of course, remove it as you bring the lettuce to the plate.

Remove the plastic wrap and place them on the bread. Stand them up with the cut side down. Do this carefully and they will hold together.

Place a crispy cheese round on top of the cut lettuce, then add the rolled anchovies.

IMG_5419

Place either the grilled chicken or shrimp along side of the bread, sprinkle with Parmesan. Drizzle some dressing onto the plate and serve.

The presentation is nice because when you want to eat the lettuce, it falls apart easily with your fork and does not require further cutting unless you cut them too wide. 2 inches is the perfect size for this presentation.

Enjoy this Caesar!

IMG_5422

Roasted Tomatoes Provençal

These slow roasted Tomatoes Provençal are a wonderfully delicious way to enjoy the full ripe flavor and natural sweetness.

TomatoesI do this to use up any extra tomatoes we don’t get around to eating fresh. One week both Robert and I brought home an arm load of fantastic heirloom tomatoes from the local farmers market.

Being February when we bought them, I knew they weren’t local but they sure looked and tasted great.

Roasting Cornish Hens for dinner one evening, I decided to also roast some tomatoes.

Here’s how:

Tomatoes Provençal

  • Good quality ripe tomatoes
  • Kosher salt or French Grey Salt
  • Fresh ground black pepper
  • Herbs d’ Provence
  • Olive oil
  • Pinch of sugar (Optional)

Slice the tomato in half. Slice it across the middle, rather than top to bottom, to expose all the seed pockets.

Gently press out the seeds, catching them in a wire mesh strainer.  Place the cut and seeded tomatoes in the strainer, cut side down. Allow them to drain for about an hour or so.

Reserve any juice and press out any additional juice from the seeds. Set this aside for later.

Use a shallow baking dish. Place the tomatoes cut side up into the dish. Don’t crowd them as we want them to roast and concentrate all around. If they are crowded together, only the outside edge will get thoroughly roasted.

Sprinkle salt, pepper, herbs and sugar is using over the tops of the tomatoes. If you like, you can also add garlic, I chose to leave it out this time.

Seasoned, ready to roast tomatoes

Seasoned, ready to roast tomatoes

Drizzle a light bit of olive oil over the tomatoes and roast them, uncovered, in a 350°F oven for at least an hour and one-half. Keep an eye on them as you do not want a dried up leathery tomato (good sometimes, not here).

When the tomatoes are done roasting, allow them to cool before serving. Their full flavor potential is best at room temperature or slightly above.

Here we served them along side of grilled cheese sandwiches and butternut squash soup.

Lunch!

Lunch!

Be prepared! They will go so fast so be sure to roast more than you need.

If, by chance, you have any left over, you can make great roasted tomato marinade or  roasted tomato vinaigrette or even roasted tomato soup.This afternoon, I am putting some on grilled cheese sandwiches for lunch. YUM!

Typically though, you have to roast the tomatoes specifically for these dishes as there never seems to be any left over.

Butternut Squash Soup Sautéed Apples and Rosemary Flowers

I made butternut squash soup in the vita mix for lunch today. Tasty!

Processing the soup for about 8 minutes heats it and leaves quite a delicate texture.

Put the ingredients in a blender, except the cream

Put the ingredients in a blender, except the cream

The texture actually seems to evaporate as it hits your tongue leaving a wonderful rich flavor and aroma behind. It is like eating essence.

Even though it is butternut squash, this elevates simple into the sublime!

1 whole butternut squash, washed

1/2 Granny Smith Apple

1/4 sweet onion

1 teaspoon rosemary needles

1/2 teaspoon kosher salt

1/4 teaspoon white pepper

1/4 teaspoon grated nutmeg

1/4 cup heavy cream

Pre-heat the oven to 350°F. Lightly pierce the squash with a knife in a couple of places. Place the whole squash on a parchment lined baking sheet and roast the squash for 1-2 hours or until done. You can tell when it is done by piercing the squash with a knife. If it goes in without resistance, the squash is done. Remove from the oven and cool.

Peel and remove the seeds from the center of the squash.

Place the squash, and remaining ingredients except the cream, into the blender and process. Begin on low variable and move up to number 10. The mixture should form 4 mounds inside the work bowl. If you want, thin with chicken stock or water at this point.

Process for 7-8 minutes or until the mixture releases steam.

Blend madly for 7-8 minutes

Blend madly for 7-8 minutes

Add the cream and process for another minute.

In the meantime, dice some of the apple and saute in a very small amount of butter. Using a light hand, sprinkle them with cinnamon and nutmeg and a pinch of salt. Set aside to garnish the soup.

saute the diced apples for garnish

saute the diced apples for garnish

Rosemary Flowers

Rosemary Flowers

Harvest some rosemary flowers, also for garnish and a great flavor burst.

To serve, ladle the soup into serving bowls, garnish each with sautéed diced apples and a few rosemary flowers.

Butternut Squash Soup with Sauteed Apples and Rosemary Flowers

Butternut Squash Soup with Sauteed Apples and Rosemary Flowers

Enjoy!

In My Kitchen, March 2013

In My Kitchen this month are many things.

Freshly made croissants

Freshly made croissants

Croissants, Hamentashen, Almond Cakes, so much to give away!

My hairdresser got the croissants (some had lovely chocolate in them),DSC_0043 Hamentashen went to many Jewish friends, IMG_5083Almond cakes went with the TV crew and one got scarfed by us smothered in lovely berries and vanilla yogurt.

There is a Peruvian Blue potato that has  sprouted so I decided to try to grow it. So far, there are at least three areas

Sprouting Blue

Sprouting Blue

“rooting”.  I think these may get grown in a bag, if I can find one, to help with harvesting later.

There is a Vita-Mix in my kitchen this month, to “play with” for school. Also included is the large Whole Foods Cookbook they produce for using the Vita-Mix.

My assignment is to come up with something to use it for next semester when my class is “Global Cuisine”. One thing I have learned is that I really like my food with texture, and I like to chew my food rather than drink it.

Visiting Vita-mix

Visiting Vita-mix

I made a wonderful tasting marinade – Citrus Ginger Marinade – that we really liked the flavor but not the emulsified texture of the marinade,sauce or dressing it could be used as. I’ll play with it for a little while longer to see what else it can do, but so far, while I like a powerful blender, it isn’t something I’d really use that often. Smoothies aren’t really my thing, eventually pureed soups need something more interesting than a smooth texture. My opinion, you may love your Vita-Mix! If so, please comment on how you use it!

Perennial herbs are beginning to show signs of growth as winter wanes.

Emerging Garlic Chives

Emerging Garlic Chives

We only had one good afternoon of snow last Saturday and it was all gone on Sunday. But, the tarragon, chives and rosemary are all showing signs of Spring.

I love eating Rosemary flowers! Right now the plant is bursting with the pale purple flowers.

Rosemary Flowers

Rosemary Flowers

Sage flowers are next and then chive flowers. Gather a bunch of them from your herb garden and pop them onto vegetables, salads or garnish almost any dish with them. The flavors are amazing, be sure to linger over it, notice it and enjoy.

Shout out to Celia over at Fig Jam and Lime Cordial for hosting the monthly In My Kitchen Posts!

There are many more things simmering away in my kitchen so I’d better grab my camera and get busy documenting.

March 2 and it has been snowing all morning. 2 weeks ago we had “thunder snow”. Local weather lore says if you have thunder snow, you will have another snow 10 days to 2 weeks later.

We had thunder snow 2 weeks ago and this morning we have lovely big fluffy flakes that have been falling all morning. The ground is far too warm for anything to stick so it is really nice to watch.

IMG_5103

Butternut Squash Soup and Grilled Cheese and Tomato Sandwiches for lunch.

Spring is near!

And that is what is happening in my kitchen this month.

Versatile Gluten-Free Almond Cake

Almond Cake with Raspberries

Almond Cake with Raspberries

This Gluten Free Almond Cake is easy to make and can take on many flavors. Depending upon what gluten-free flour you choose, the cake can be quite different each time you make it.

You can add fruit, nuts or chocolate chips for greater variety. Glaze recipes are at the end.

You will need:

      • 2 eggs
      • ½ cup milk
      • ½ cup honey
      • 2 ounces melted butter  (1/2 stick)
      • 2 teaspoons vanilla extract

2-1/2 cups almond meal* (see note below)

    1-1/2 Tablespoons baking powder
    1/2 Tablespoon kosher salt

Preheat the oven to 350°F

Spray a 7″ tubular or bundt cake pan with pan spray set aside until ready to use.

Combine the almond meal with the salt and baking powder, mix well, set aside.

Combine the vanilla, eggs, honey, melted butter and milk in a large bowl. Mix well to combine.

Fold the dry ingredients into the wet ingredients. Stir to combine. The consistency is cake batter. If what you have is too thin, add more almond meal.

Pour into prepared cake pan; bake for 30 minutes or longer. Insert a toothpick, if it comes out clean, the cake is done.

Allow to cool 10-15 minutes before removing the cake from the pan.

Glaze with honey or fondant glaze

Chestnut Cake with Almonds and Blueberries; Honey Glazed

Chestnut Cake with Almonds and Blueberries; Honey Glazed

Honey Glaze:

Melt 2 ounces of honey with 2 ounces of butter, drizzle over cooled cake

Fondant Glaze:

  • ½ cup confectioners’ sugar
  • 1 tablespoon milk
  • Pinch salt
  • 1-2 drops vanilla

 Chocolate Fondant Glaze:

Pistachio Cake with Chocolate Drizzle

Pistachio Cake with Chocolate Drizzle

Add 1 teaspoon dark cocoa powder to the fondant glaze recipe above. Mix the cocoa powder with the confectioners sugar for an even blend.

Special Note:

By changing the gluten-free flour used from almond to pistachio, or chestnut, you can produce some really nice and different cakes.

You can also use Splenda in exchange for the honey. Additionally, you can use agave syrup as well.

Enjoy!

Pistachio cake with chocolate fondant and toasted chopped pistachios

Pistachio cake with chocolate fondant and toasted chopped pistachios

Chestnut cake with honey glaze

Chestnut cake with honey glaze

Almond Cake with raspberries, fondant drizzle and toasted almonds

Almond Cake with raspberries, fondant drizzle and toasted almonds