Green Tomato Chow-Chow

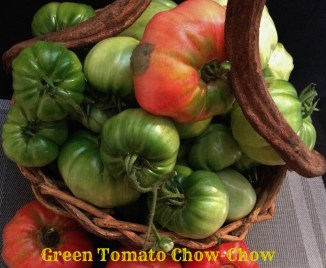
This is my Dad’s Green Tomato Chow-Chow recipe. I think it originates from Nova Scotia, Canada as it is also known as “Nana’s Chow-Chow. It is made only with green tomatoes and onions, vinegar and spices. All my life, I’ve eaten precious rationed portions of this delicious mixture and called it Dad’s Green Tomato Chow-Chow.

I’m here to tell you this is really good stuff.

There are many recipes for chow-chow out there, Southern recipes call for everything left in the garden that is harvested just before the first frost: cabbage, peppers, onions, cucumbers. This one is different. And, it gets better as it ages.

Wash the tomatoes, and there is no peeling or seeding required!

Green Tomato Chow-Chow

Chow Chow PicIngredients:

8 cups chopped green tomatoes

4-6 medium sweet onions, sliced

1/2 cup kosher salt

(use non-iodized salt)

2 cups granulated sugar

1 1/2 cups white vinegar

1 teaspoon turmeric

(If using fresh turmeric, shred about 1 inch of a knob)

Grating fresh turmeric

Grating fresh turmeric

2 Tablespoons Pickling Spice in a bag (I used a tea ball)

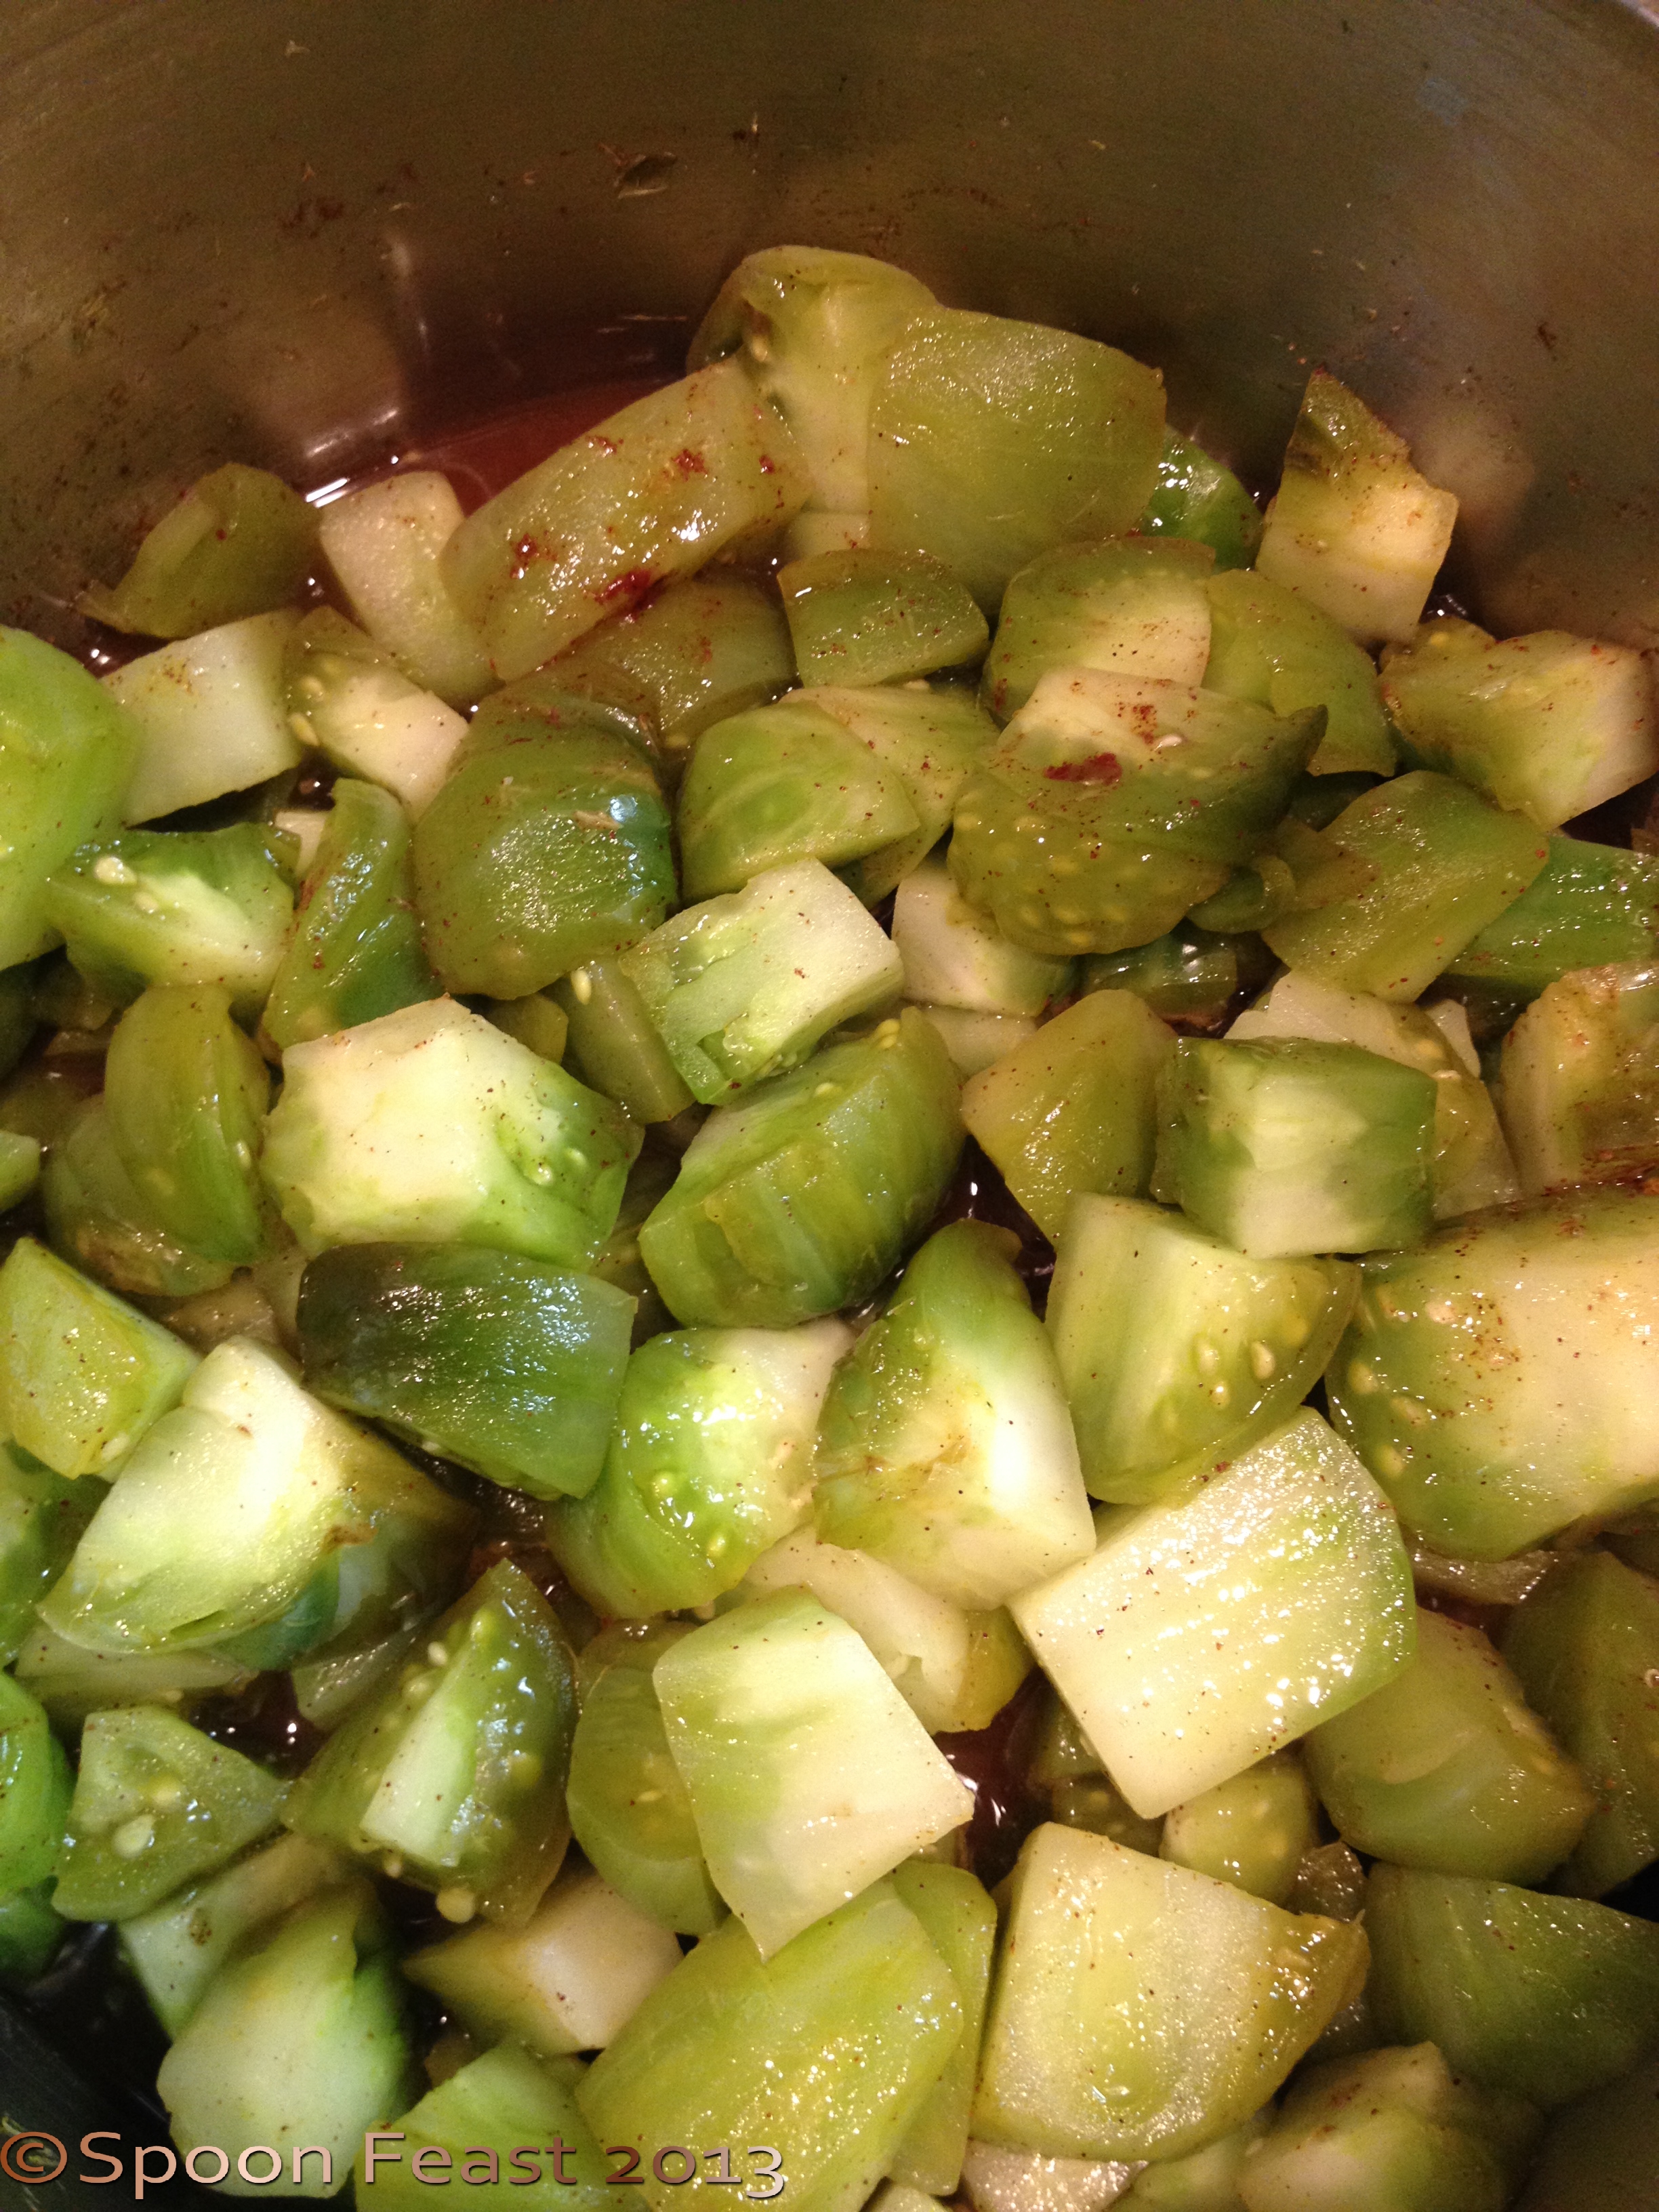
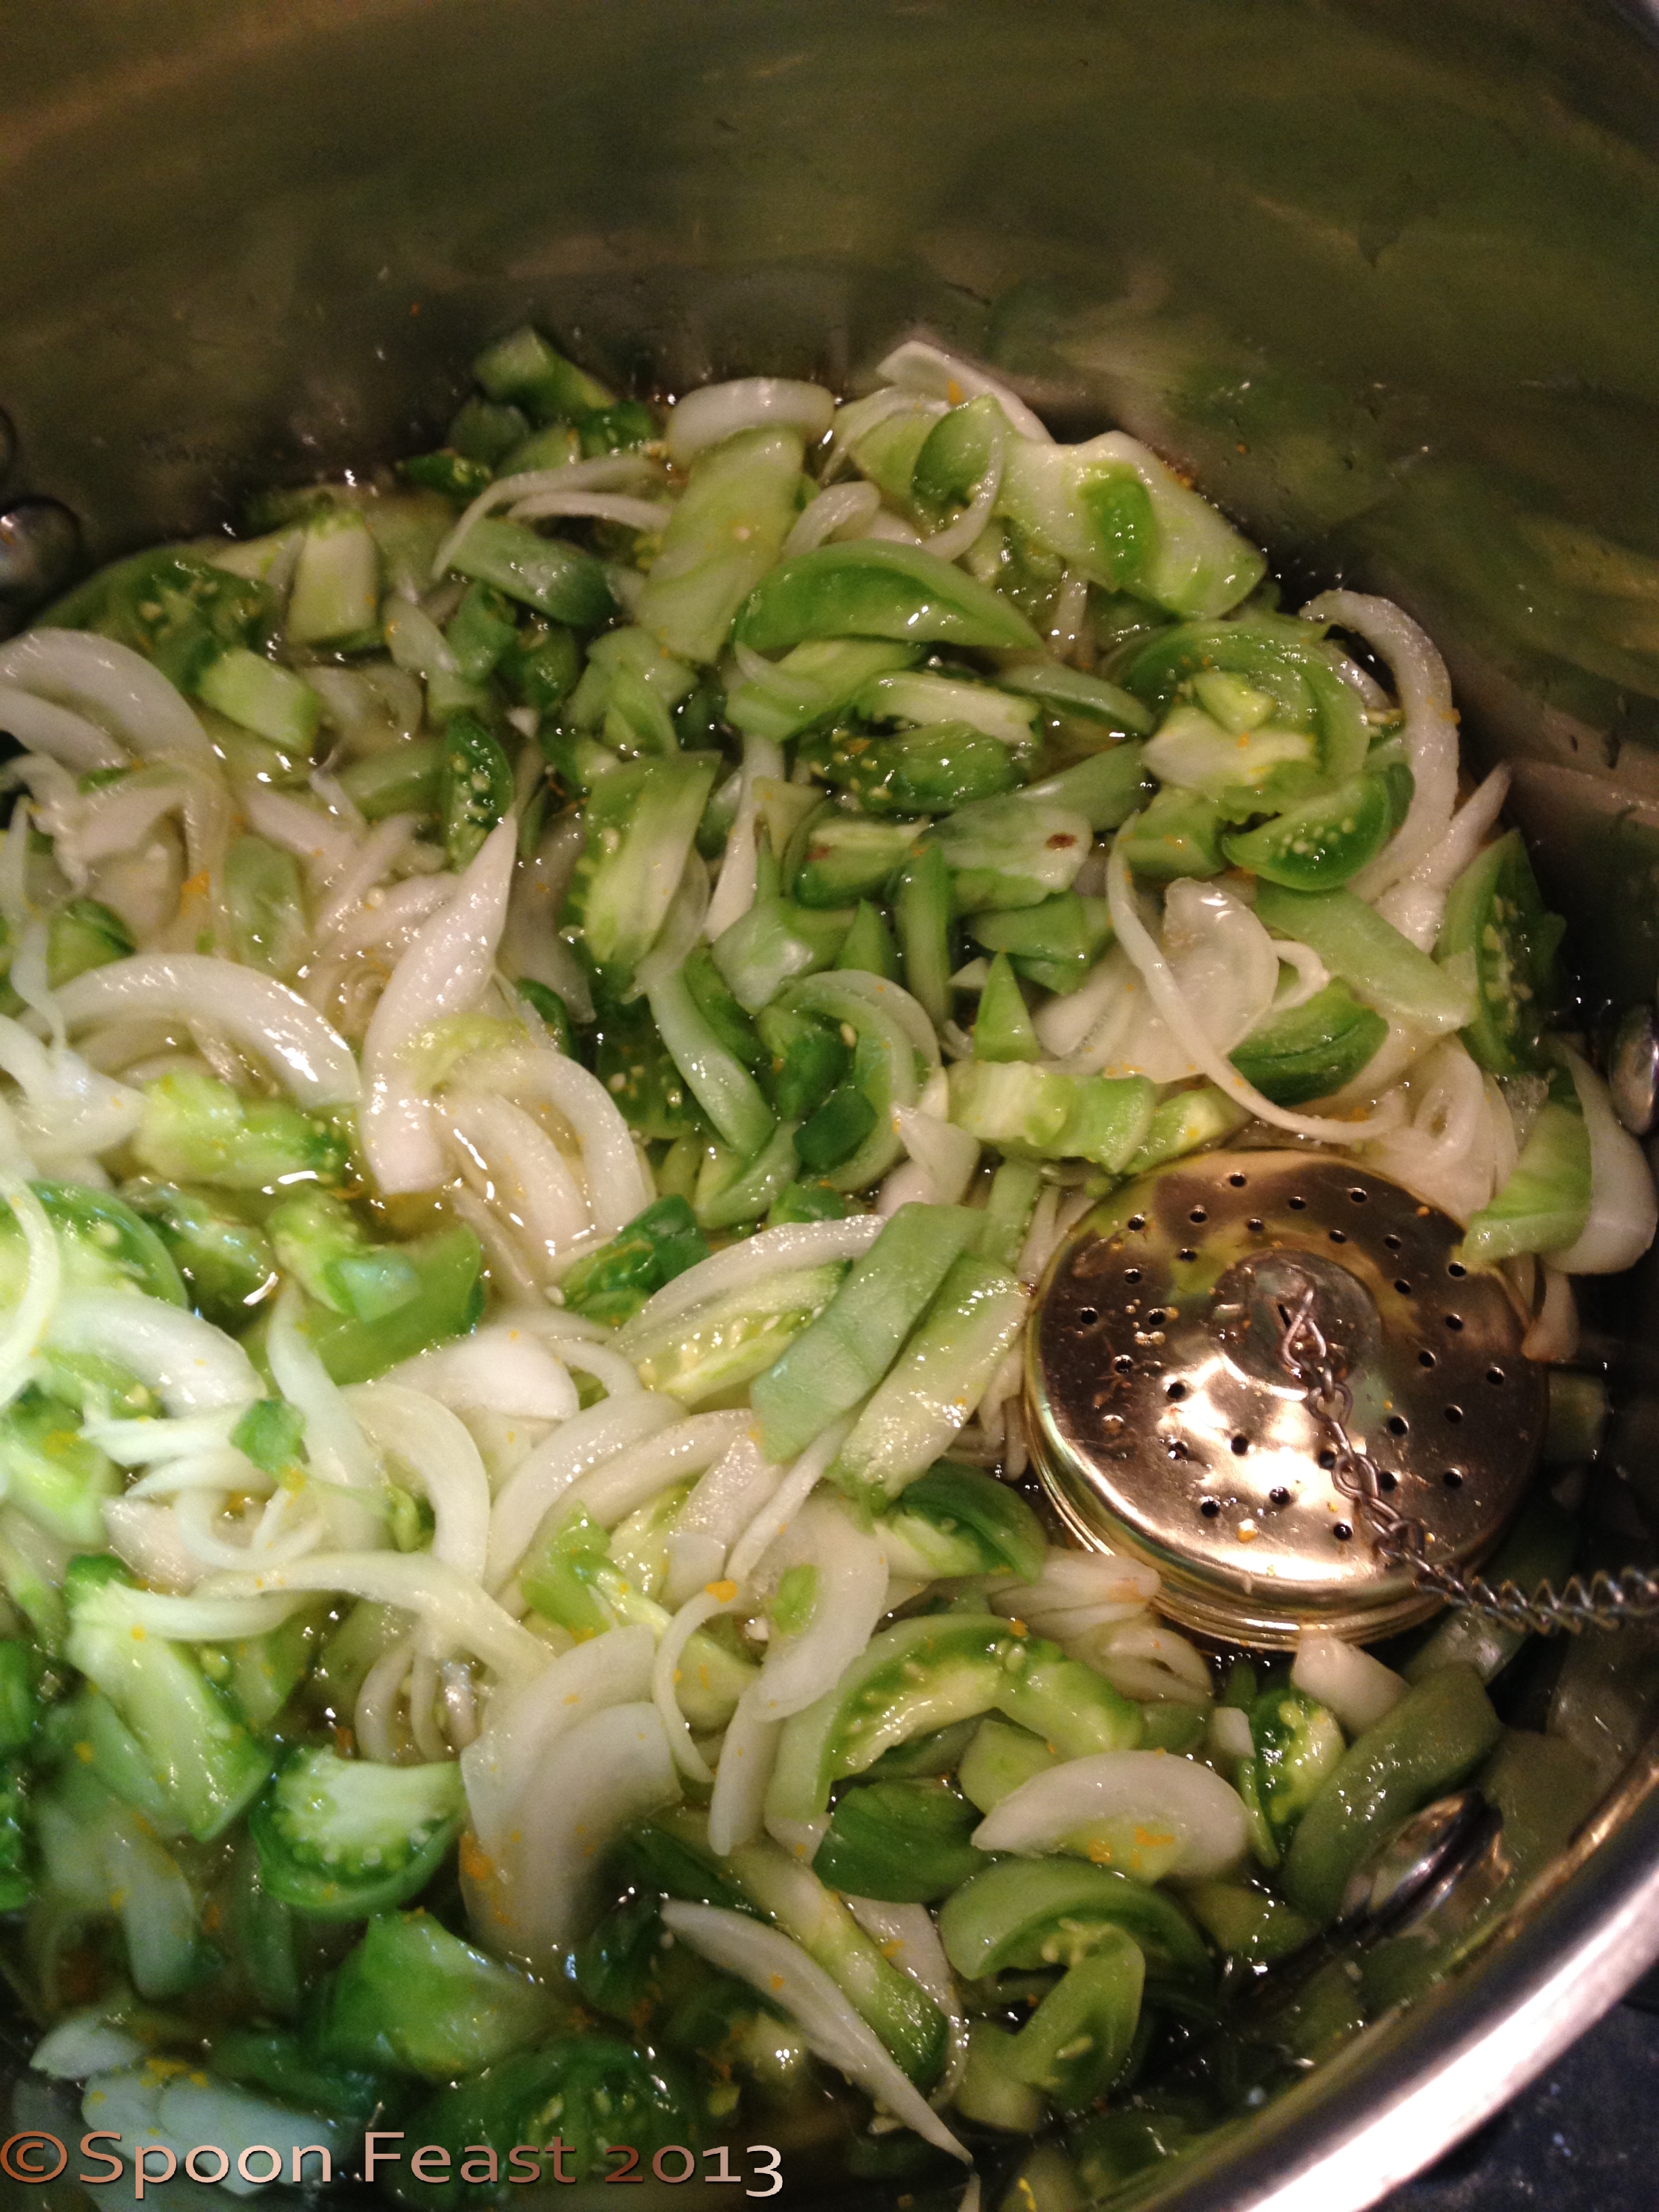
Wash and slice the tomatoes and onions.

in a large bowl, sprinkle the salt over the tomatoes and onions; set a plate on top, cover and let this sit overnight. In the morning, rinse the tomatoes and onions to remove the salt. Strain, place into a large pot with the vinegar, sugar, turmeric and pickling spice.

Simmer the tomatoes and onions with pickling spices

Simmer the tomatoes and onions with pickling spices

Green Tomato Chow-chow

Bring to a boil, reduce to an active simmer and then let this simmer for 1 1/2 hours. Stir frequently to prevent sticking.

The entire mixture will cook down to a lovely sweet, tangy concoction with a jam like consistency. This is so good on grilled meats, as a glaze for ham or chicken or as a condiment with cheese.

One of our favorite ways to have it is with beans and cornbread. It makes the meal.

Chow-chow with grilled chicken leg quarters

Chow-chow with grilled chicken leg quarters


This is what it looks like when finished

This is what it looks like when finished

My Dad says this is a real treat because it is only made with the green tomatoes picked just before the first freeze. He says he can’t pick a tomato when it can turn red on the vine. He loves his tomatoes! I know he spoiled me from store-bought tomatoes. Every year, I always grow a plant or two. Sometimes successful, sometimes not. It’s a tradition to grow tomatoes every year.

I’ve encouraged mom to make him a Green Tomato Pie because he has been fascinated with making pies that taste like apple but not using apples. In the past he’s used zucchini and Ritz crackers (separate pies), so I hope he can add green tomato soon.

Another delicious slice of Green Tomato Pie

Another delicious slice of Green Tomato Pie

When I asked mom to make him a pie, he quickly said there weren’t enough greens left and frankly he’d rather have chow-chow.

I’ll have to wrap and send him a bottle to see how he likes it.

#greentomatochowchow #chowchow #southerncooking #pickling #dadsrecipe #southernfoods #passeddownrecipes #recipesfromhome

Jar of Green Tomato Chow-Chow

Jar of Green Tomato Chow-Chow


Green Tomato Pie or “Pied Green Tomatoes”

Final Harvest!

Final Harvest!

With a frost settling in, everyone is scrambling to gather whatever tomatoes are left on the vines.

Faced with a basket of lovely green orbs, here’s what I decided to make with them.

"Pied" Green Tomatoes!Be sure the tomatoes are hard and show no signs of ripening or else they will turn to mush when cooked.

Green Tomato Pie or “Pied” Green Tomatoes

  • 4 cups peeled and cut green tomatoes
  • juice from 1/2 lemon
  • zest from 1 lemon
  • 1 teaspoon cinnamon
  • 1 teaspoon kosher salt
  • 1/4 teaspoon ground cloves
  • 1/4 teaspoon ground nutmeg
  • 1/4 cup raisins
  • 3/4 cup granulated sugar
  • 2 tablespoons instant tapioca
  • 2 Tablespoons butter
  • Pie crust for top and bottom crusts

Use a peeler to remove the skin from the tomatoes. Because they are green, the traditional method of blanching them in boiling water, shocking and then peeling does not work. The green tomatoes are hard, like an apple, so peel them as you would apples. No need to remove seeds, as the seeds are hardly developed.

Chop the tomatoes into bite sized pieces. Put them into a sauce pot with the lemon juice, lemon zest, and salt; bring to a simmer over low heat.

Chopped Green Tomatoes simmering for pie filling

Chopped Green Tomatoes simmering for pie filling

You will notice a lot of juice being released by the tomatoes. Add the cinnamon, nutmeg and cloves.

Stir this mixture often. When you see it come to a boil, add the sugar and simmer for 5-6 minutes. You want the tomatoes to become tender but not mushy.

Add the butter and instant tapioca to the simmering tomato mixture, remove from heat and cool. The tapioca thickens the juices as it cools. You want the mixture to be cool when you put it into the pastry shell.

While the tomato filling is cooling, make your pie dough, roll it out and line your pie tins or tart shells. If using already made (store-bought dough) prepare your pie pans.

Pre-heat your oven to 435°F while you fill the pie shell.

Fill the shells with the cooled tomato filling. Be sure to cut vents into the top crust. Seal the edges of the crust; brush the top with milk and sprinkle with sugar. I like to use raw sugar for the larger crystals.

Green Tomato Pie in the oven

Green Tomato Pie in the oven

Bake in the pre-heated oven for 45 minutes or until the crust is golden brown and the filling is bubbly. You may need to add a foil shield around the crust edge to prevent it from getting too brown. Do this only after the edges are browned already, not when you first put the pie into the oven.

Additionally, place the pie on a sheet pan to catch any drips that may bubble out of the pie during baking. The sheet pan is easier to clean than the oven.

Believe it or not, I couldn’t find a single solitary pie tin of any kind in my kitchen! I used to be a pie making queen. Where are they? All I could find is the fluted tart pans. So I had to use them and put a top crust on anyway. I tried a strusel topping but I didn’t care for the flavor combination with the filling. So I suggest you use a top crust.

If you have a bunch of green tomatoes hanging around, try this pie. It tastes like apple pie made with Granny Smith Green Apples, the texture is the same too.

Whip up some whipped cream, add a dash of cinnamon and serve.

I still have a full basket of green tomatoes so next I’ll be making my Dad’s Green Tomato Chow Chow. Watch for the recipe!

In the meantime, make a Green Tomato Pie. You’ll be pleasantly surprised!

A delicious Green Tomato Pie

A delicious Green Tomato Pie

Another delicious slice of Green Tomato Pie

Another delicious slice of Green Tomato Pie

Green Tomato Pie

Green Tomato Pie

Sauteed Kale with Bacon and Onions

Today I picked up some fresh kale, just picked from the garden, from a friend. Since I was eating alone tonight, I decided that  some bacon would be on the menu. Robert doesn’t eat bacon but I sure do!

Sautéed Kale with Bacon and Onions

  • Fresh Kale
  • 2 slices thick smoked bacon
  • 1/2 sweet onion
  • 1/4 cup malt vinegar
  • Fresh ground pepper
Fresh picked kale

Fresh picked kale

To start, remove the stems from the kale and wash well. Allow it to drain while preparing the bacon and onions.

To make this dish, fry up some bacon, try not to burn the pan because you want the lovely brown bits on the bottom of the pan for all the flavor. In cooking terms this browned bottom is called “fond”.

When the bacon is cooked, remove it from the pan, place it on some paper towels to drain. For this dish, the bacon is best cooked to done but not crispy. However is you want it crispy, have at it.

If there is a lot of grease, pour some off. All you need is a small bit to saute the onions and kale in, not too much.

Slice and saute some sweet onions in the bacon pan. When the onions are soft, deglaze the pan with a splash of malt vinegar, bring to a boil, and loosen all the fond from the pan.

Saute onions in the bacon pan

Saute onions in the bacon pan

Add the washed and stemmed kale, bring to a boil and saute the kale until done. The liquid should be almost gone, but not all gone.

Cut the bacon into matchstick sized bits and fold into the kale. Cook until the kale is tender, about 4-5 minutes.

Grind some fresh pepper and serve.

I just filled a bowl and ate it. If you like, add a dash of hot sauce.

I love greens this way!

Kale with Bacon and Onions

Kale with Bacon and Onions

Thanks for All The Fish

I am going on an alarming rant here, about the condition of the oceans and the fish that swim in them. This is a very sobering situation and it seems there are only a few people talking about this.

It is stated that the entire Pacific Ocean will be completely contaminated with radiation by 2016.

Let that sink in. By 2016, if not sooner.

We should all be very alarmed.

Fukushima has always been a world issue but only a few dedicated heroic Japanese are working non-stop to solve the problem. The brains of the world should step in and assist in trying to figure out what should and could be done.

However, I feel it is already far too late to save the food we get from the oceans. The blue fin tuna being caught off of the California coast are testing positive for radiation.

This is not the radiation we commonly find naturally in food; our bodies have adapted to that. In case you didn’t know, bananas, Brazil nuts have extremely low doses of potassium-40 and we have naturally occurring radiation such as radon and radium. Our bodies have adapted to potassium-40. Potassium does not collect in our bodies, any excess is dumped. And we have adapted our environments to deal with radon.

We are referring to radioactive elements such as cecium-137 which has a half-life of 30 years, and idoine-129 and iodine-131 has a half-life of 8 days as an internal transmitter, while iodine-129 has a half-life of, get this, 15.7 million years. Additionally, Fukushima has dumped radioactive strontium-90 which is also a strong internal transmitter, mimics calcium and collects in bones.

We have not adapted to these elements and they cause cancer. Cecium-137 is hard to avoid due to the environmental and atmospheric  testing of bombs. Cecium-137 enters the body through food and milk. It is chemically similar to potassium and is processed in the body the same as potassium.

Cecium-137 collects in muscles; Iodines in the thyroid and strontium-90 collects in bones. These are not naturally occurring radioactive elements are extremely dangerous. Due to the long half-lives, exposure is cumulative and builds up until one or the other perishes.

Please read this article and series of articles regarding this on the blog Washington’s Post, poke around while you are there and read more.

There are articles, studies and research that back the information up so it’s not just some doomsday freak writing scare tactic articles.

Yes, I’m sure you have heard about the talking heads saying the levels of radiation are harmless and much lower that what we encounter everyday in our natural environments and medical procedures.

To quote the blog “Washington’s Post”

The bottom line is that there is some naturally-occurring background radiation, which can – at times – pose a health hazard (especially in parts of the country with high levels of radioactive radon or radium).

But cesium-137 and radioactive iodine – the two main radioactive substances being spewed by the leaking Japanese nuclear plants – are not naturally-occurring substances, and can become powerful internal emitters which can cause tremendous damage to the health of people who are unfortunate enough to breathe in even a particle of the substances, or ingest them in food or water.

Unlike low-levels of radioactive potassium found in bananas – which our bodies have adapted to over many years – cesium-137 and iodine 131 are brand new, extremely dangerous substances.

And unlike naturally-occurring internal emitters like radon and radium – whose distribution is largely concentrated in certain areas of the country – radioactive cesium and iodine, as well as strontium and other dangerous radionuclides, are being distributed globally through weapons testing and nuclear accidents.

At this point, I’m not sure if there is anything “we” can do except be aware. I predict our time to eat ocean fish from any ocean is limited. In five years, we may not be able to eat any more ocean food.

I went to high School in Tokyo Japan. I still have many friends living there, in Hawaii and Guam. They all express concern and have fears of what the future may bring.

It makes me wonder, would it be safe to live on the coast? Go to the beach? What about walking in the rain?

Life as we know is it going to change. Just as we now bring our own shopping bags as we grocery shop, we’ll need to add a Geiger counter. Hope they make a purse size.

The worlds scientists say it is OK to eat Pacific seafood. Is this to avoid mass panic? Is the issue being glossed over because there isn’t anything anyone can do? What will the future be like in 10 years?

So many questions without answers.

Geiger-Müller radiation detector.

Geiger-Müller radiation detector. (Photo credit: Wikipedia)

What happens when the safe drinking water supply to a city like Tokyo is contaminated with radiation? Where and how does an entire country get relocated?

#6550 Iodine-131 found in ground water

#6550 Iodine-131 found in ground water (Photo credit: Nemo’s great uncle)

Should we just go on about living as if nothing is happening? What do we do? What will you do?

Imagine future generations saying things like, “Can you believe they used to eat these things?”

All I can say, is I’m glad to have had the chance to eat seafood and enjoy it tremendously. I’ll miss it terribly. Thanks for all the fish!

Succulent Pumpkin

Make A Succulent Pumpkin!

You can make a gorgeous Succulent Pumpkin that will last a long time.

Depending upon where you live, the pumpkin will last typically until Spring. It will naturally mush out by then so be sure to keep a liner under it when you bring it indoors.

If you live in a warm climate, it may last a while; in a cold climate, protect from freezing.

This is what you will need to make one:

1 largish pumpkin

Choose one that has an indention or depressed area on top. This will hold soil and moss as well as the plants.

Choose a well-indented pumpkin

Choose a well-indented pumpkin

I choose white or neutral colored pumpkins since they can last until Spring. Orange looks outdated soon after Thanksgiving. Orange is NOT the new black, trust me. No matter how much you may love Halloween or Thanksgiving, orange gets old quick out of season.

Sheet Moss

Various succulents

The rule of thumb:

  • 1 to Thrill

  • 1 to Fill

  • 1 to Spill

Choose what you like. Get one or two showstoppers for the thrill

Choose one that will fill in the area between plants as it grows. The spilling one is a great element. My favorite is called “String of Bananas”. It grows fast and cuttings are easy to root.

At the nursery, choose what plants appeal to you and cluster them together. You want smaller plants generally, but look for a variety of texture, shapes, heights, and colors.

You will also need some U-shaped pins to hold things in place.

In a nutshell, here’s what you need:

  • Pumpkin
  • Succulents
  • Moss and pins

Here’s what you do:

Wash and dry the pumpkin. Working on a newspaper to collect the soil, remove the selected plants from their pots. Carefully knock off any loose soil. You will see, most have small root balls.

Place the succulents around the pumpkin in a pleasing manner. Use pins to anchor any plants in place being careful not to pierce any leaves of the succulent plants. (Yes, you pin into the pumpkin)

Soak the moss a few minutes in warm water to hydrate. Cover all soil and “nest” the succulents with the damp moss. Pin moss in place so it doesn’t slide off when it dries out.

Use a variety of color and shape

Use a variety of color and shape

That’s all there is to it!

Succulents like dryer soil so be sure to water every now and then. Protect from freezing below 32°F.

When your pumpkin mushes out, save the plants and replant them in a shallow dish garden until next Fall when you can make another Succulent Pumpkin!

Succulent Pumpkins

Succulent Pumpkins


In My Kitchen October 2013

Last week we were swimming at the lake, today we are wearing light sweaters and sipping hot tea.

Ahh! Welcome Autumn!

After canning my rear end off last month, its nice to look at something other than mason jars and canning pots. I’m quite sure we will enjoy these things come cooler months.

I got to pull some of my china and other “stuff” out of storage and put into use this lovely oil dispenser. Pottery Oil Can

I really like this one. It was hand-made by an artist in Boca Raton, FL. I adore using well made pottery.

Pumpkins and squash fill my counters. Ready to eat this season.

These various squash found their way into my basket while shopping this weekend.

These various squash found their way into my basket while shopping this weekend.

I love roasting squash and serving it with butter, salt and fresh pepper. Yum.

Yesterday I made Butternut Squash Soup for lunch with Grilled Cheese and Tomato Sandwiches pressed on the Panini press.

We have a lovely pumpkin and fall squash display on the front step.

Stacked Pumpkins on the step

Stacked Pumpkins on the step

I topped one with moss and succulents for accent;

Pumpkin with Moss and Succulents

Pumpkin with Moss and Succulents

we are progressively eating our way through the rest!

While this October edition of In My Kitchen was due a good while back, I’ve been quite busy working on a few things.

For one, I studied my butt off to take the certifying exam for “Certified Dietary Manager” or CDM. I’ve been cramming medical nutritional therapies and medical codes into my head and now that I’ve passed the exam I have more free time to blog.

In My Kitchen now are 6 molds of goat cheese draining,

Goat Cheese Draining

Goat Cheese Draining

2 bread loaves rising, lobster tails, stone crab claws and Mimosa’s for lunch because today is my birthday!

And it’s time to start working on November’s In My Kitchen! Celia of Fig Jam and Lime Cordial, Hosts this wonderful gathering each month. Visit and join in!

Stuffed Mini Pumpkins

Pile of Pumpkins!Autumn is one of the great seasons; watching the color of the leaves turn, the brisk crisp coolness in the air and the emergence of pumpkins and squash in the market.

These various squash found their way into my basket while shopping this weekend.

These various squash found their way into my basket while shopping this weekend.

Today I saw these mini pumpkins and some white pie pumpkins, so I filled my basket.

This stuffed mini pumpkin makes a great little side dish. The best part is you can fill it with a variety of things, from soup to salad or use it to hold grains or a mix of things like I did here.

When using a variety of things inside the pumpkin, remember to cut them small so you can get a bit of everything in one bite.

I think these would make a really pretty side dish on  Thanksgiving table or buffet.

To present them on a platter, think ‘patch patch’ and decorate around the pumpkins with salad greens or Brussels sprouts.

Serve stuffed mini pumpkins on a platter, think "Pumpkin Patch"

Serve stuffed mini pumpkins on a platter, think “Pumpkin Patch”

To prepare the pumpkins, cut the tops off using a sharp knife. Then gently scoop out the insides and discard.

Season the pumpkins inside with salt and pepper and a small bit of fresh butter.

Steam the pumpkins until the inside flesh is tender. Test by using a fork or tip of a paring knife.

Do not poke through the shell to test doneness, that would cause the pumpkin to leak any liquids you put inside.

Once the flesh is done, place the pumpkins upside down on a clean towel and allow them to drain for a few minutes.

Carefully fill each pumpkin with the filling. If serving warm, cover each pumpkin with tin foil and put it in an oven set at 400°F for 30 minutes or until the contents are warm.

If serving the pumpkins cool or at room temperature, chill before filling.

The filling used for these pumpkins is a filling that reflects the changes of the season. Stuffed Pumpkin

Pumpkins Stuffed Roasted Beet, Sweet Potato, Dried Cranberries with Toasted Pecans and Feta Cheese

  • 1 medium-sized beet, roasted, cut into very small cubes
  • 1 medium sweet potato, roasted, cut into very small cubes
  • 1/4 cup toasted pecan pieces
  • 1/4 cup finely chopped dried cranberries
  • 2 tablespoons crumbled feta cheese

Keeping the vegetables separate as you cut them, roast them for about 10 minutes in a 350°F oven or until each cube is done through.

Chop the toasted nuts and dried cranberries then combine them in a bowl, add the beets and potatoes as they finish roasting. Mix together and sprinkle in the feta cheese. Adjust seasonings with salt and pepper. A touch in cinnamon or ginger is a very nice addition and fragrant too.

Either cool the mixture to serve cold or warm the mixture then stuff the pumpkins. Cover with the pumpkin “lid”, wrap in foil and warm in the oven.

Use spatulas to lift the cooked pumpkins because the skin gets delicate and tears easily.

Honey Peppercorn Vinaigrette

Honey Peppercorn Vinaigrette

  • 1/2 cup white balsamic vinegar or white wine vinegar
  • 1 tablespoon honey
  • 1 tablespoon ground mixed peppercorns, use pink, white, dried green, black and Szechuan peppercorns for maximum interest
  • 1 clove garlic, minced
  • 1/2 Tablespoon shallot, minced
  • 1 teaspoon kosher salt
  • 1 cup good quality vegetable oil

Combine all ingredients except the oil in a large bowl, whisk together. Add the oil and whisk to combine. Adjust seasonings, stir or shake just before serving.

Top the stuffed pumpkins with a bit of Honey Peppercorn Vinaigrette just before serving and add a bit to the stuffing for added moisture.

I hope you try making these stuffed mini pumpkins this season. Personally I love squashes of all kinds and look forward to  this time of year.

Happy Fall!

Plated stuffed mini pumpkin